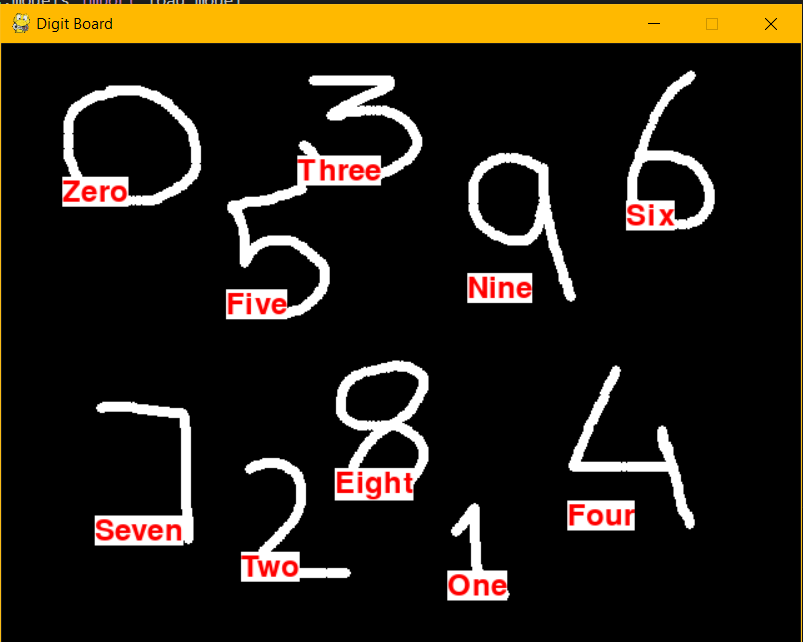
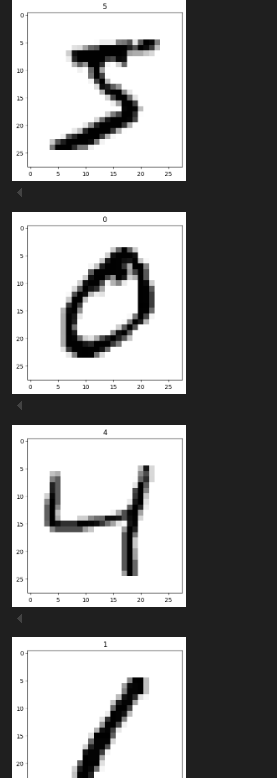
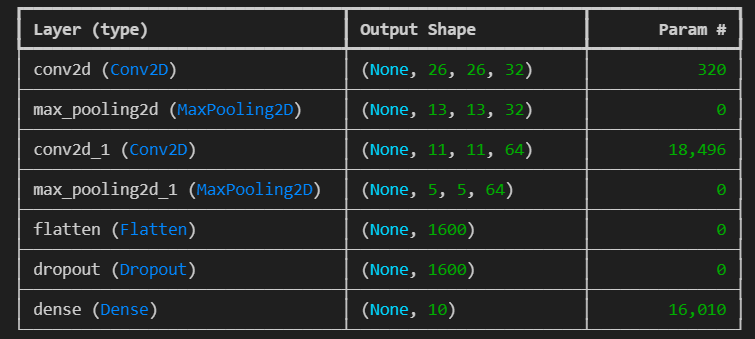
This project focuses on detecting handwritten digits using machine learning techniques. It includes preprocessing the MNIST dataset, dimensionality reduction, training models such as Regression and Neural Networks, and deploying a functionality to recognize digits on a screen board and Vocalize the recognized digits.
Bike Share Marketing Analysis in R and Presentation in Tableau
Analyze 12 months of Divvy data to see how we can convert casual riders into annual members.
Use tidyverse to wrangle data, dplyr to clean data, lubridate to wrangle date attributes, ggplot2 to visualize data, and readr to save csv for further analysis.
Built a presentation in Tableau with the marketing analytic team and primary skateholder audiences in mind.
Bellabeat Fitness Data Analysis in R and Visualization in Tableau
Analyze fitness trend for 30 user data to see how we can help guide marketing strategy for the company.
Use tidyverse to wrangle data, dplyr to clean data, lubridate to wrangle date attributes, ggplot2 to visualize data, and readr to save csv for further analysis.
Built a presentation in Tableau with the marketing analytic team and primary skateholder audiences in mind.
An abstract base repository with predefined common features.
Before starting
The repository pattern has several objectives :
Encourage development good practices (separation of concerns, code reusability, …)
Improve code testability
Before using this package, you should be familiar with the repository pattern, and especially with its Laravel implementation.
You can know more about it by reading the several articles you’ll can find on Internet about this.
Here is one among others : https://medium.com/@jsdecena/refactor-the-simple-tdd-in-laravel-a92dd48f2cdd.
Notes :
This base repository does NOT allow you to manipulate the model : it can sometimes be tempting to directly manipulate the model from your controller but this is not recommended and recognized as a bad practice.
You should always fill your repositories interfaces : it can avoid huge errors on your projects.
The provided methods are shortcuts to avoid you to declare them in your own base repository or in several repositories. Keep in mind that they only are pre-defined methods and that you should declare new methods in your repositories if they does not fit with your needs.
Installation
The repository pattern setup is not complicated but requires several steps to be accomplished.
Follow them one by one :
Install the package with composer :
composer require okipa/laravel-base-repository
Create a app/Repositories directory where you will store your different project repositories.
Create your app/Repositories/BaseRepositoryInterface.php interface and your app/Repositories/BaseRepository.php abstract class :
<?phpnamespaceApp\Repositories;
interface BaseRepositoryInterface extendsOkipa\LaravelBaseRepository\BaseRepositoryInterface
{
// add here your own custom method contracts (if necessary).// they will be implemented in all your repositories.
}
<?phpnamespaceApp\Repositories;
abstractclass BaseRepository extendsOkipa\LaravelBaseRepository\BaseRepository implements BaseRepositoryInterface
{
// add here your own custom method declarations (if necessary).// they will be implemented in all your repositories.
}
Create a first UserRepositoryInterface and its associated UserRepository :
<?phpnamespaceApp\Repositories\Users;
interface UserRepositoryInterface
{
// add here the users method contracts./** * @return void */publicfunctiontest();
}
<?phpnamespaceApp\Repositories\Users;
useApp\Repositories\BaseRepository;
useApp\Models\User;
class UserRepository extends BaseRepository implements UserRepositoryInterface
{
protected$model = User::class;
// add here the users method declarations.publicfunctiontest()
{
\Log::info('test');
// manipulate your model as needed. Example : $this->model->create(['email' => 'whatever@email.test']);
}
}
Create your project app/Providers/RepositoryServiceProvider.php file. You can follow the example below :
<?phpnamespaceApp\Providers;
useIlluminate\Support\ServiceProvider;
useApp\Repositories\User\UserRepositoryInterface;
class RepositoryServiceProvider extends ServiceProvider
{
/** * Bootstrap any application services. * * @return void */publicfunctionboot()
{
//
}
/** * Register any application services. * * @return void */publicfunctionregister()
{
// users$this->app->bind(UserRepositoryInterface::class, UserRepository::class);
// then, register all your other repositories here ...
}
}
Add your RepositoryServiceProvider to the providers declarations of the Laravel framework, in the config/app.php :
Specifications for the server-state project’s core aspects
Please note that this repo contains specifications for the core modules of the project, i.e., primarily server-base and client-base. Specifications specific to modules (e.g., grammars for linux-raid-module will exist in the specific module’s repository.
Languages and formats
Supported document formats for this repo are
PNG, SVG, GIF, JPG
LaTeX (with compiled PDF alongside it)
Markdown (.md)
While other formats are acceptable, you should not use them when not necessary.
Special supported Markdown Syntax
As the main deployment of these docs gets built with docsify (and some plugins, cf. index.html), we support special Markdown features such as callouts, LaTeX and PlantUML. You can find a list of them below.
(
la versione in italiano è “CanaryShell-ita.ps1“; come guida c’è questo articolo )
This PowerShell script for Windows 10 allows you to create another customizable script that is able to monitor a “canary file” (that can be any file) and its folder. The general purpose is to stop malwares (like ransomwares) or attackers from deleting or copying the content of that folder, or at least the script should alert the user while it’s happening. The monitoring resources consumption is almost null, the script just check few small data periodically.
USAGE
The procedure is simple:
create a file that will act as a disguised sentinel for its folder (name it with an appealing name and don’t leave it empty)
run CanaryShell.ps1 and follow its instructions to set: the action you want as an alarm, how often the “canary file” have to be checked, etc. at the end of the quick process, a PowerShell script (named as you want) will be generated
set the created PowerShell script as a task that runs at Windows startup, or when a certain user logs in, or at set time intervals, or in a folder to be launched manually.
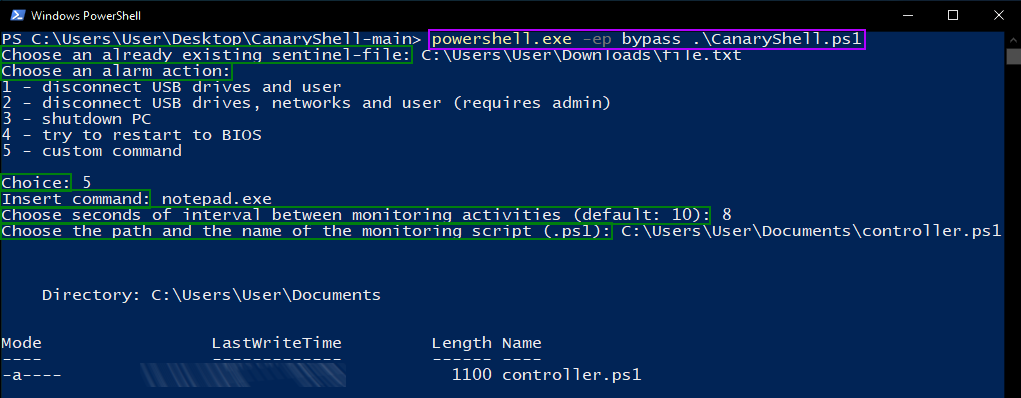
Example:
In this case we run CanaryShell from its folder, “file.txt” will be the “canary file”, the custom alarm action will be launching Notepad, the checking interval will be 8 seconds and the monitoring script will be “controller.ps1” in the Documents folder.
MONITORED CHANGES
The monitoring scripts looks for:
change of “canary file” last access time (it’s not always updated in real time by Windows)
canary existence (changing its name or its folder name are also not allowed)
canary or its folder are copied
canary or its folder are mentioned in PowerShell command history
ACTIONS
When the monitoring scripts it’s running, any time the “canary file” or its folder are copied, deleted, moved, renamed, using keys shortcuts or Explorer, or even cited in a command executed in a PowerShell terminal, the chosen alert action will be triggered. So it’s crucial to remember to don’t look even in the “canary file” properties tab, because it will change its last access time, which is monitored by the generated script. Also coping the folder is suppossed to happen after having turn off the monitoring activity (how? well, it depends if it’s a scheduled task or it’s run manually). It’s obviously possible to keep using, opening, changing all the other files, or create new ones, inside the monitored folder; just avoid doing it using PowerShell terminal, because if you mention the full folder path or the “canary file” name and exstension, the alarm will be triggered.
Alarm actions can be like:
USB drives and networks disconnection then a user logoff, to isolate the folder and stop malicious local or remote processes;
a forced PC shutdown to then access the disk in a passive way;
anything you decide to set as custom alert, can be a simple command that open an empty Notepad or a link to a script that executes predefined actions accordingly to some conditions. Remember to evaluate carefully other folders permissions, when admin rights are required and then set actions accordingly.
! WARNING !
When you set the alert action and the interval between monitoring check, remember to look out for endless loops: for example, if the script starts at every user logon, the interval is set to 5 seconds and the alarm action is “logoff”, it means that if something triggers the alarm changing an info that is compared with a permanent one in the monitoring script (like last access to the “canary file”), what will happens is that any time you will try to log on, you will have 5 seconds to block the scripts execution (in task manager) before you get logged off again. You will be however able to access the PC with other user profiles (unelss you set the task to run with any user), or using CMD in recovery mode, or maybe with live OS (if the disk is not encrypted), to better investigate what triggered the alarm and if anything happened to your folder. Just consider (and test carefully) your settings choice, always leaving a way to react to the alarm action after it got initiated.
Mojang provide mapping file of obfuscated class, field, and method name for minecraft mod developer.
This program applies mapping file to original minecraft code. It does not decompile jar,
but only apply mapping. You have to decompile jar with your favorite decompiler after deobfuscate minecraft with mc-remapper.
Compile
Java 17 is required to compile MC-Remapper.
Clone project to your local machine and open terminal in the directory where build.gradle located.
Run following command to compile.
./gradlew installDist
Runnable script and runtime libraries will generate under build/install/MC-Remapper.
Usage
Open terminal at build/install/MC-Remapper/bin.
Execute MC-Remapper (Mac/Linux) or MC-Remapper.bat(Windows) with following parameters.
Arguments
Execute with specific file
To run mc remapper with a specific file, you can provide input jar and mapping txt.
Input jar is path to file or url of obfuscated minecraft client or server.
Mapping txt is path to file or url of proguard’s mapping txt file. You can find it at .minecraft/versions/$version$/$version$.json file.
Execute with version
To run mc remapper with automatically download artifact and mapping tt, you can provide artifact name and version id.
Artifact name is either server or client.
Version id is release version or snapshot version.
Options
–output or –output-name(Default=Generate from other arguments)
Path to output file. If file already exists, overwrite it.
–thread (Default=8)
Number of thread used for apply mapping to class.
–fixlocalvar (Default=no)
Fix local variable name \u2603(☃).
This variable name declared multiple time in same scope,
so some decompiler does not work. There are three options.
option
description
no
Do not fix
rename
Rename problematic local variable to debug$index like debug1, debug2…
delete
Delete problematic local variable
–reobf (Flag, Default=no)
This option is useless for now. Both forge and bukkit modify nms with their own mapping, therefore applying this option is meaningless
Reobf option reverses mapping direction. By default, MC-Remapper map obfuscated code to deobfuscated code. However, if you write your mod/plugin with deobfuscated minecraft source and apply it to forge/bukkit, minecraft will crash with NoClassDefFoundException, NoSuchMethodException, or else. That’s because, forge or bukkit use obfuscated code, but your plugin tried to access to deobfuscated code. In this case, you have to re-obfuscate your mod/plugin to use obfuscated minecraft code. You can
use this option to map deobfuscated to. obfuscated code.
For csrg/srg mappings, this option is needed to apply deobfuscating mapping. i.e. deobfuscating = –reobf, reobfuscating = no –reobf.
–format (Default=proguard)
Supported mapping format: proguard, csrg, srg
–autologger (Flag, default=no)
Static final fields with type org.apache.logging.log4j.Logger is automatically renamed to LOGGER if it is not explicitly renamed by the mapping.
–autotoken (Flag, default=no)
Members’ names that are Java keywords are automatically appended an underscore (_).
–mappackage (Map, default=None)
Renames packages AFTER other mappings are applied. Can occur multiple times, where they are merged.
chmod +x project_init.sh # or `project_init_2.sh` to load world1 or world2 respectively.
Run simulation
./project_init.sh
Launch the explorer launch file
roslaunch explorer_bot explorer_map.launch
Warning! You may need to catkin_make twice. First time tend to fail due to rosservice msg created.
Package Overview
Nodes wall_detector processed /scan to detect wall’s ahead, and next block’s left, front and right walls. /wall_scan topic published for walls detected.
box_navigator simple navigation to allow the robot move from one box to another. /move_north ros service to move to the north direction. /move_east east direction. /move_south south direction. /move_west west direction. /turn_north ros service to turn to the north direction. /turn_east east direction. /turn_south south direction. /turn_west west direction. /is_moving topic published to indicate robot has movement in progress.
explorer path planning and search node that uses wall_detector and box_navigator.
Srv MoveGoal to send geometry_msgs/Pose2D as goal to box_navigator.
send returns a promise that is fulfilled with the result of the method or
rejected with an error. The first argument of send is the name of the method to
invoke in the application, the following arguments are the parameters to be
passed to that method.
exit gives the app a chance to respond and prompt to cancel to prevent losing
unsaved work. (TODO)
TODO: Add methods for binding/connecting observables.
TODO: Add methods for connecting streams.
System Interface
Apps should be able to read and write to the file system in a simple manner.
Este proyecto es un clon en desarrollo del clásico juego Metal Slug, utilizando C con SDL2. La estructura está modularizada para facilitar el mantenimiento, pruebas y escalabilidad del código.
🚀 Características
Jugador animado con movimiento, salto y disparo.
Enemigos con IA básica y detección de colisiones.
Escenario desplazable con múltiples capas.
Sistema de animaciones separadas para jugador y enemigos.
Coordinadas de piso leídas desde archivo.
🧱 Requisitos
SDL2
SDL2_image
CMake ≥ 3.10
Compilador C compatible (GCC, Clang, MSVC)
🛠 Compilación
Linux / macOS
cmake -S . -B build
cmake –build build
./build/metal_slug
Windows
cmake -S . -B build -G “MinGW Makefiles”
cmake –build build
./build/metal_slug.exe
🗂 Estructura del Proyecto
.
├── build/                  # Archivos generados por CMake
├── cmake/                  # Configuración adicional de CMake (si aplica)
├── modules/                # [Reservado para futuras dependencias externas]
├── src/                    # Código fuente del juego
│   ├── animation/          # Módulo de animaciones
│   │   ├── animation.c/h
│   │   ├── animation_enemies.c/h
│   ├── game/               # Lógica principal del juego
│   │   ├── game.c/h
│   ├── input/              # Captura y manejo de eventos de teclado
│   │   ├── input.c/h
│   ├── render/             # Renderizado de jugador, enemigos y escenario
│   │   ├── floor.c/h
│   │   ├── render.c/h
│   │   ├── render_enemies.c/h
│   ├── resources/          # Recursos gráficos y de coordenadas
│   │   ├── backgrounds/
│   │   ├── coors/          # Archivos .txt con coordenadas del piso
│   │   ├── enemies/
│   │   ├── menu/
│   │   ├── players/
│   ├── main.c              # Punto de entrada del juego
├── CMakeLists.txt          # Script de compilación con CMake
├── .gitignore
🎮 Controles
Acción
Tecla
Mover
Flechas (← → ↑ ↓)
Saltar
Barra espaciadora
Disparar
Z
Salir
ESC
📁 Recursos
Los recursos están en src/resources/:
backgrounds/: fondos de escenario
players/: sprites del jugador
enemies/: sprites enemigos
coors/: coordenadas del piso (*.txt)
📌 Notas de desarrollo
El archivo game.c contiene la lógica del loop principal y puede refactorizarse aún más para separar lógica del bucle, gestión de estado y renderizado.
Se recomienda agregar pruebas unitarias para las animaciones y lógica de colisiones en el futuro.
El código fuente está preparado para una futura migración a escenas múltiples y sistema de menú.
📄 Licencia
Este proyecto es un clon educativo y no comercial de Metal Slug. No pretende infringir ningún derecho de propiedad intelectual de SNK o sus afiliados.


 https://github.com/AnshulRathee/Handwritten-Digit-Recognition-using-MNIST