Fast ROPChain generator for controlling the value of registers.
This will find the gadgets by heuristics that the missing gadgets will be alternated by equivalent gadgets.
Platform
OS
OS
status
Linux
tested
macOS
TODO
Windows
TODO
Architecture
x86, x64 architectures are supported.
Features
Fast (Implemented in C++)
Alternative gadgets will be used by heuristics in case required ROPGadgets (e.g., pop rax; ret) are not found.
Able to exclude specific characters if needed.
Requirement
C++17
Boost.Python
radare2 (Optional)
rp++
Usage
Executable
Usage: ropchain -f <filename> --[reg]=<value>
-a: Architecture, "x86" or "amd64"
-b: Base address of binary file
-d: Dump mode
-f: Filename
-g: ROPGadget loader, "r2" or "rpp"
-i: Characters which should be excluded (e.g., -iabc
--[reg]: Register value (e.g. --rax=0x1234 --rbx=11
Example
Executable
ropchain -f /bin/ls -g r2 --rax=0x114514 -d -a amd64
Retrieve papers and metadata from the command-line.
Intended for papers referenced in MedLine/PubMed.
Install
pip3 install bibtools-pkg
Use
Generic
Returns exact matches when using unique identifiers (PMID, DOI).
Fetch PubMed Central for open-access papers as well as Sci-Hub:
bibtools -i PMID # Single PMID or DOI

bibtools -i PMID1,PMID2 # Comma-separated PMIDs and/or DOIs

bibtools -i pmids.dat # List file of PMIDs (or DOIs), one per line

bibtools -i PMID -b # Generate bibtex from MedLine citation data

bibtools -i PMID -p /path/to/directory # With custom storage path. Default is current working directory
bibtools

https://github.com/synthaze/bibtools <florian.malard@gmail.com>

Usage:
  bibtools OPTION...

Options:
  -h, --help             show help
  -i, --input=STRING     comma-separated PMIDs or DOIs
  -l, --list=FILE        list of PMIDs or DOIs, one per line
  -p, --path=STRING      path where to write files
  -b, --bibtex           write bibtex files
  -c, --cite             print latex style TITLE~\cite{header}
  -a, --abstract         print latex style ABSTRACT~\cite{header}
#! /bin/bash# Run command background
sleep 100 &# List jobs backgroundjobs# Bring command to frontfg %1
backup-current-directory
#! /bin/bash
DATE=`date "+%Y_%m_%d_%H_%M_%S"`
tar -czvf ~/Desktop/${DATE}.tar ./*echo""echo"*** Back up success, go to ~/Desktop/${DATE}.tar ***"echo""
#! /bin/bash# C++ name demangling
c++filt __Z4mainiPPc
dev-tools-security
#! /bin/bash# If you didn't enable Developer Mode using Xcode you will be asked to authorize the debugger every time you use it. To enable Developer Mode and only have to authorize once per session use:
sudo /usr/sbin/DevToolsSecurity -enable
# You might also need to add your user to the developer group:
sudo dscl . append /Groups/_developer GroupMembership $(whoami)
#! /bin/bash
git add featureA
git commit -m "Feature A is done"# [dev fb2f677] Feature A is done
git add featureB
git commit -m "Feature B is done"# [dev 733e2ff] Feature B is done
git add featureA
git commit --fixup fb2f677
# [dev c5069d5] fixup! Feature A is done
git log --oneline
# c5069d5 fixup! Feature A is done# 733e2ff Feature B is done# fb2f677 Feature A is done# ac5db87 Previous commit
git rebase -i --autosquash ac5db87
# pick fb2f677 Feature A is done# fixup c5069d5 fixup! Feature A is done# fixup c9e138f fixup! Feature A is done# pick 733e2ff Feature B is done
#! /bin/bash# list all network services
IN=$(networksetup -listallnetworkservices | awk '{if (NR>1) print $0 ";"}');while IFS=";"read -ra SERVICES;doforiin"${SERVICES[@]}";doecho"${i} DNS Servers:"
networksetup -getdnsservers "${i}"donedone<<<"$IN"
query-terminfo-database
#! /bin/bash# clear the screen
tput clear
# save cursor position
tput sc
# move cursor position
tput cup 10 13
# hide cursor
tput civis
# show cursor
tput cnorm
# show output
tput rc
rename-git-remote-repo
#! /bin/bash# print current remote repo url
git remote -v;# after go to github.com and edit your repo name# execute command below to set remote name and url
git remote set-url $0$1;
git remote -v;
#! /bin/bash
variables=("http_proxy""https_proxy""ftp_proxy")
foriin"${variables[@]}"doexport$i="socks5://localhost:1080"done
env | grep -e _proxy | sort
echo -e "Proxy-related environment variables set."## Reference: https://gist.github.com/patik/6d40ded40bf93c2f381b## You can define the code as bash function and automatic set the # proxy variables when you lauch a bash shell.## To delete the variables, execute unset $VAR_NAME in bash.
#!/bin/bash# Copy from https://github.com/hollance/neural-engine/blob/master/docs/is-model-using-ane.md
image list IMAGE_NAME
# This prints the path to the IMAGE_NAME framework, something like this (it will be different on your machine):
image dump systab 'put-the-path-here'
talk-content
#! /bin/bash

say "Hello world!"
translate-rgb-to-hex
#! /bin/bash
hex=$(printf "#%02x%02x%02x"${1:-0}${2:-0}${3:-0})echo -n $hex| pbcopy
echo -e "\033[31m Result ${hex} copy to the clipboard."
translate-words-with-dict
#! /bin/bash

open dict://$1
zprint
#! /bin/bash# Show information about kernel zones
sudo zprint
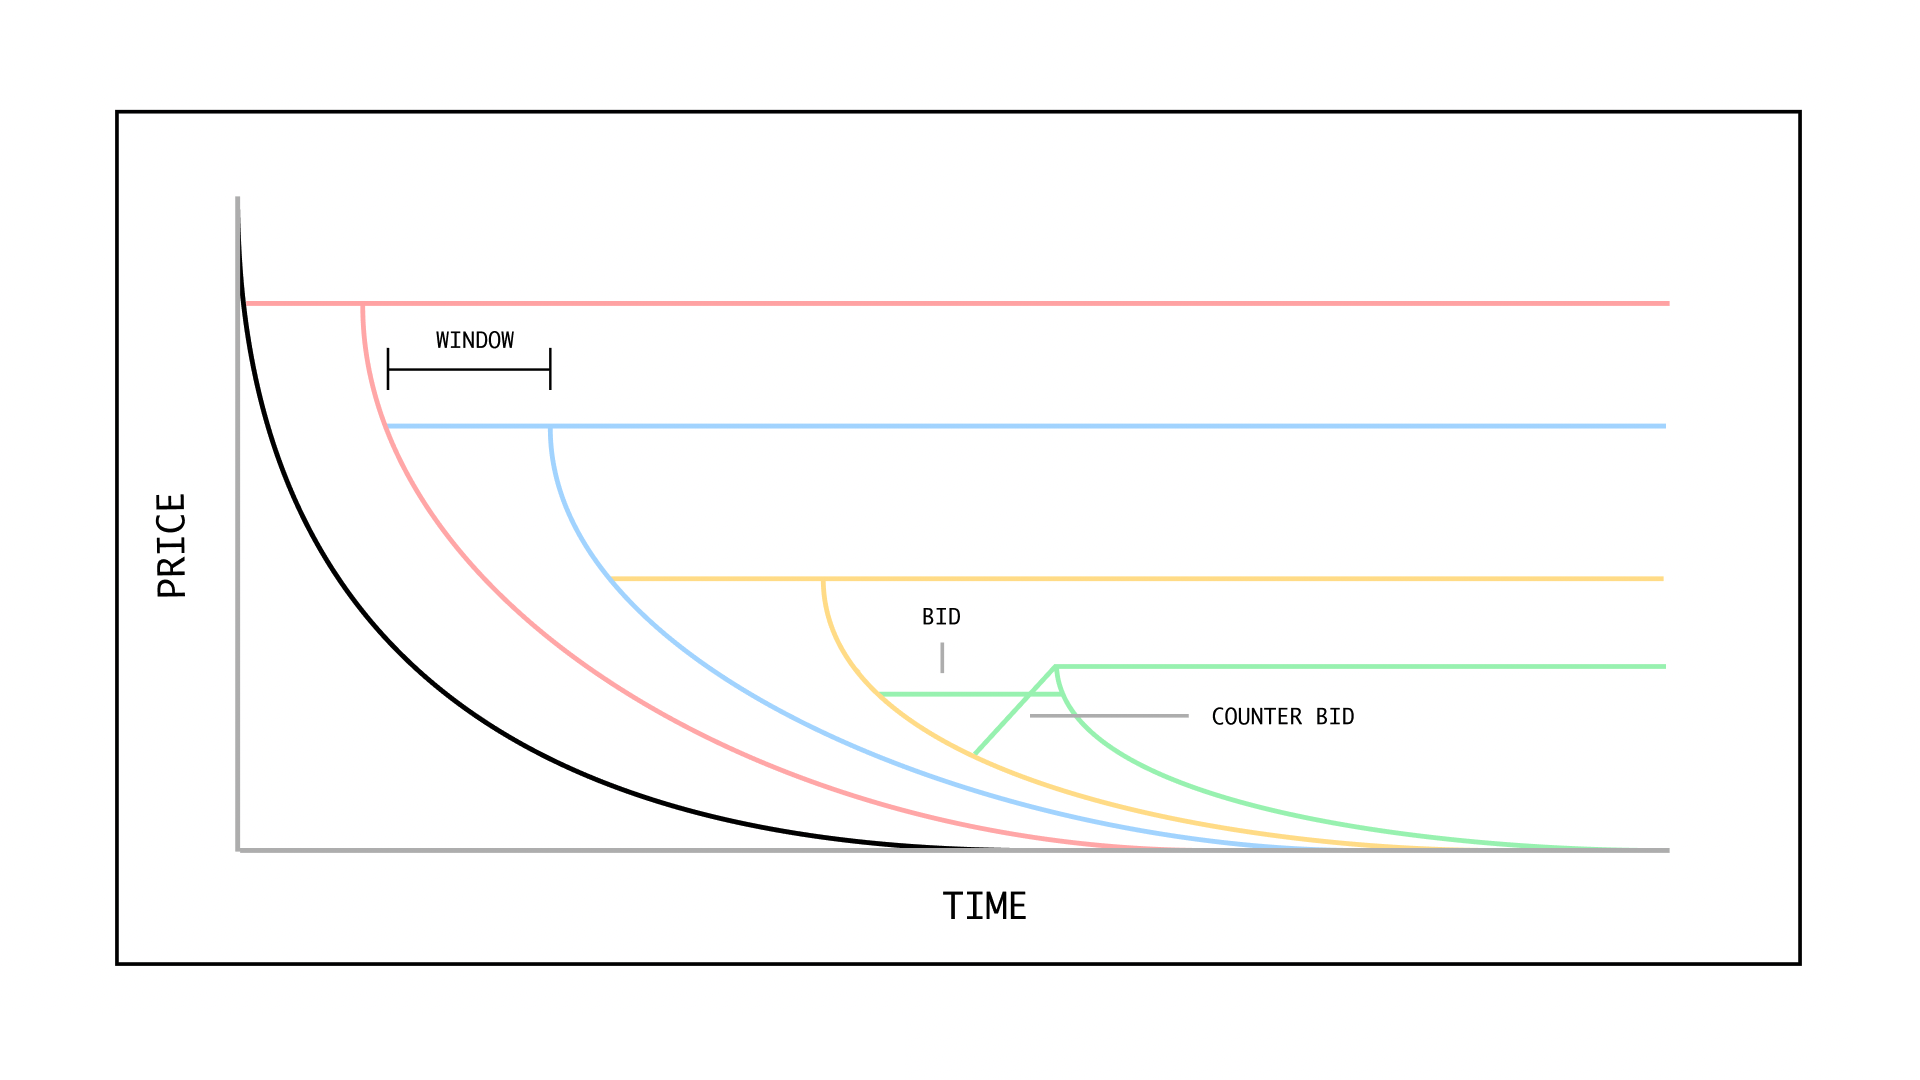
Composite decay resets a point on the curve to it’s current coordinates normalising the slope, making price decay inversely proportional to bid activity. This occurs whenever an auction “window” or “tranche” is initialised, which is when a participant submits a bid; which must be equal or greater than the current scalar price.
The Rolling Dutch auction introduces composite decay, meaning the price decay of an auction is reset to compliment a slower rate of decay proportional to bid activity. This occurs whenever an auction “window” or “tranche” is initialised, which is when a participant submits a bid; which must be equal or greater than the current scalar price.
This repository contains the Unity project for GMTK 2023.
Gameplay
Since the theme was Roles Reversed, we built a reversed snake where you control fruits instead of the snake and the mission is to save as much fruit as you can.
How to play
Use arrow keys to move the selected fruit and space to change the currently active character. If things get too tough, hold R to reset the level.
There are currently two types of levels:
Ones where you need to make the snake kill himself to win;
Ones where you can escape or make a partner escape without killing the snake.
At the start of each level, a window will tell you what’s the way out of it.
Getting Started
To run and modify the game locally, follow these steps:
Clone or download this repository to your local machine.
Open the Unity game project using Unity Editor (version 2021.3.25f1 or later).
Explore the project files and assets in the Unity Editor.
Play the game in the Unity Editor by clicking the “Play” button.
Deployment
The game is configured to be deployed on itch.io using GitHub Actions. The deployment process is automated through the following steps:
Build – A GitHub Actions workflow is triggered whenever changes are pushed to the master branch. The workflow builds the game as WebGL using Unity’s build pipeline.
Release – After a successful build, the workflow creates a new release on GitHub and attaches the game build as an artifact.
Deploy – Finally, the workflow deploys the game to itch.io by uploading the artifact to a specific game project.
To set up the deployment for your game, you need to configure the necessary secrets and adjust the workflow file located at .github/workflows/build-and-deploy.yml to match your project’s needs. Please look at the official documentation of GitHub Actions and itch.io for more information.
Next Steps
There are no current plans to work on this project any further but if ever someone will pick it up from here, there are a few things to correct:
Handle the difficulty curve. Apparently, the first level it’s very hard to complete and makes many players stop playing on the very first try.
Add more levels. 5 playable levels are currently implemented, however, there’s the potential, with the currently implemented mechanics, to design a few more.
Add music in the background
Add a tutorial section, in the game jam version we assumed that everyone knew the famous game: Snake. We were wrong.
Add sound effects when a character is close to being eaten
The goal of this project is to realize a small real time operating system for the TI MSP432 Board. The OS is going to have different functionalities, but the main objective is to be able to schedule different kinds of tasks, and to handle possible deadline violations, in order to keep the system in a safe state.
This is particularly useful in real life scenarios where there is a need for a system which, shouldn’t fail at all, or at least fail in the most possible safe way, in order to minimize damage to people and / or systems.
You can learn more about the project in the bottom sections and here:
In this project 3 kind of tasks are took into consideration:
Anytime task: this is the most common type of tasks. After its designed period of execution ends, the scheduler simply performs a context switch and schedule the next task.
Soft Task: this task should not exceed its designed period of execution, but if it does, even if there would be some problems, nothing catastrophics happens. The system still needs to call soft_time_violation() handler to perform some actions in order to put the system in a safe state.
Hard Task: this is the most critical kind of task. The failure of this task to comply with the timing constraints may cause catastrophic consequences, like damage to people or systems, so in this implementation of the OS a hard_time_violation() routine is called, in order to put the system in a safe state, in the shortest time possible, and reboot it / shut it down.
Implementation
The Task type is defined by the following enum:
typedefenum {
ANYTIME,
SOFT,
HARD
} TaskType;
while each tasks come with some associated metadata:
typedefstruct {
uint32_tpid;
uint32_tcounter; // example field to save task specific datauint32_tpriority;
} TaskData;
SysTick
To be able to preempt tasks that are currently executing we need an interrupt. In this case SysTick was specifically designed for this purpose, so let’s use it.
This is the configuration:
/* Configuring SysTick to trigger at 1500000 (MCLK is 1.5MHz so this will make it toggle every 1s) */void_systick_init() {
/* Disable the SysTick timer during setup */SysTick_disableModule();
/* The Core clock is 3MHZ so put any multiple to achieve the desired period */SysTick_setPeriod(SYSTICK_PERIOD);
Interrupt_enableSleepOnIsrExit();
SysTick_enableInterrupt();
SysTick_enableModule();
}
And this is the Interrupt Handler that it is called every 4 seconds:
void SysTick_Handler(void)
{
    elapsed_seconds = elapsed_seconds + (SYSTICK_PERIOD / CLOCK);

    /* ANYTIME TASK TIME VIOLATION */
    if (elapsed_seconds > ANYTIME_DEADLINE && type == ANYTIME) {
            logToLCD(&g_sContext, "Anytime Task took");
            logToLCD(&g_sContext, "too much time");
            logToLCD(&g_sContext, "Calling Scheduler");

            int i;
            for(i = 0; i < SCREEN_DELAY; i++); //Delay
            scheduler(&g_sContext);
        }

    /* SOFT TASK TIME VIOLATION */
    if (elapsed_seconds > SOFT_DEADLINE && type == SOFT) {
        logToLCD(&g_sContext, "Soft Task took too much time");
        int i;
        for(i = 0; i < SCREEN_DELAY; i++); //Delay
        soft_time_violation(); // Calling time violation routine
    }

    /* HARD TASK TIME VIOLATION */
    else if (elapsed_seconds > HARD && type == HARD) {
        logToLCD(&g_sContext, "Hard task has failed to comply");
        logToLCD(&g_sContext, "to time constraints.");
        logToLCD(&g_sContext, "SYSTEM HALTING NOW");
        int i;
        for(i = 0; i < SCREEN_DELAY; i++); //Delay
        hard_time_violation(); // Calling hard time violation routine
    }

}
In the Systick Interrupt Handler an important step of the RTOS is being executed. The variable elapsedTime gets incremented and it gets then checked against deadline time conditions, to see if a task has been running for more time that it should. If so, exceptions routine will be called, such as:
soft_time_violation()
hard_time_violation()
Scheduler
To have an effective scheduling policy we need to first keep track of some informations about the tasks we want to execute. We need a Task Control Block, let’s see it:
typedefstruct {
TaskStatestate; /* Current state of the task */TaskTypetype;
void (*taskFunc)(void); /* Pointer to the task function */TaskData*stackPointer; /* Pointer to the location of the task's data in the stack */
} TaskControlBlock;
Every task that is being created and then executed has an associated TaskControlBlock that is then kept track of in an array:
TaskControlBlocktasks[MAX_TASKS];
In scheduler.h the following functions are defined:
The initTask function just initializes all the tasks in the array with default values.
Semaphores
Every OS needs its semaphores implementation. This is no different for a real time os. In this case I defined three main functions in semaphore.h and semaphore.c:
semaphoreInit()
semaphoreWait()
semaphoreSignal()
As straightforward as it sounds, semaphoreInit() initializes an integer semaphore, of a variable size. semaphoreWait() tries to lock a resource, if it is available, and semaphoreSignal() releases the lock on a resource.
The interesting thing is that each the wait() and signal() have been designed to be atomic. They use two specifics ARM instructions (ldrex and strex) to do that.
Implementation
Let’s see the implementation for the wait and signal.
// ATOMIC IMPLEMENTATION -- using LDREX, STREXvoidsemaphoreWait(Semaphore*sem) {
uint32_ttmp;
do {
while (sem->value <= 0) {
// Busy wait
}
// Attempt to decrement the semaphoretmp=__ldrex((volatileuint32_t*)&sem->value);
tmp--;
} while (__strex(tmp, (volatileuint32_t*)&sem->value) !=0);
// Memory barrier to ensure the operation is complete_dmb();
}
// ATOMIC IMPLEMENTATION -- using LDREX, STREXvoidsemaphoreSignal(Semaphore*sem) {
uint32_ttmp;
do {
// Attempt to increment the semaphoretmp=__ldrex((volatileuint32_t*)&sem->value);
tmp++;
} while (__strex(tmp, (volatileuint32_t*)&sem->value) !=0);
// Memory barrier to ensure the operation is complete_dmb();
}
ldrex and strex are ARM-specific instructions used to implement atomic operations. They are crucial for ensuring that operations on shared resources in a concurrent environment are performed atomically, meaning that no other operations can interfere while they are being executed.
The ldrex reads the value from a memory location and marks it as being in the exclusive state. It essentially sets up a monitor on the address, indicating that the program intends to perform an atomic update on this address. strex attempts to write a new value to the same memory location that was previously loaded by ldrex. The store will only succeed if no other writes have occurred to that location since the ldrex. The result of the operation is returned: 0 if the store was successful and 1 if it was not.
How to use the nexmo-go client library to send an SMS using Go.
Prerequisites
You’ll need to have Golang installed on your development machine. Installation instructions can be found on the official Golang website.
Alternatively, if you’re new to Go, or you don’t want to go through the installation process, you can work directly in the Golang Playground instead.
Using the Nexmo API Client for Go
Your SMS and Go journey begins by installing the API client itself. You can do this by running:
go get https://github.com/nexmo-community/nexmo-go
Next, fire up your editor and create a new file called main.go. Then scaffold the basics of a Go application by typing (or copying) the following code:
package main
import (
"net/http""github.com/nexmo-community/nexmo-go"
)
funcmain() {
}
Note: If you save and the files in the import statement disappear, don’t worry, they’ll come back once you use them inside the main() function.
Now it’s time to put some meat on those bones and instatiate the Nexmo client so you can actually make it do things.
First, you create an auth object that combines your API key and secret together using a helper function that will ensure everything is formatted correctly.
Note: Your API key and secret can be found by logging into your Nexmo Dashboard. If you don’t have an account yet, you can sign up here and get a starter free credit to run this code!
Second, you instantiate a new client that will hold all the functionality the nexmo-go library provides. Your auth object is passed into this.
With this in place you can now perform actions on the Nexmo API, such as sending an SMS.
Send SMS Messages with Go
With the Nexmo API client ready to go, your code will now look like this:
In order to send an SMS with Go you first need to create a SendSMSRequest object that contains all of the information an SMS needs to make it to its destination such as the number it should be send to, the number it’s sendiing from and the text that should be displayed.
It can be added to main.go below where you instatiated the client and is formatted like this:
smsContent:= nexmo.SendSMSRequest{
From: "447700900004",
To: "14155550105",
Text: "This is a message sent from Go!",
}
Of couse, you’ll want to replace these numbers with real ones for testing. The To number can be your own number but the From number must be an SMS capable number purchased via your Nexmo Dashboard.
Now the only thing left to do is to actually send the SMS. This is done using the SendSMS function provided by the API client.
Finally, add a quick bit of error checking and response output:
// If there are errors, log them outiferr!=nil {
log.Fatal(err)
}
// All is well, print the message status returnedfmt.Println("Status:", smsResponse.Messages[0].Status)
The stage is set to send that SMS! Head to your terminal and from inside the folder you’re working in run:
go run main.go
If everything worked you’ll see Status: 0 returned to the screen just before the familiar sound of your SMS notification rings out signalling your success.
All The Code
For your reference, all the code for sending an SMS with Go comes together like so:
package main
import (
"fmt""log""net/http""github.com/nexmo-community/nexmo-go"
)
funcmain() {
// Authauth:=nexmo.NewAuthSet()
auth.SetAPISecret("API_KEY", "API_SECRET")
// Init Nexmoclient:=nexmo.NewClient(http.DefaultClient, auth)
// SMSsmsContent:= nexmo.SendSMSRequest{
From: "447700900004",
To: "14155550105",
Text: "This is a message sent from Go!",
}
smsResponse, _, err:=client.SMS.SendSMS(smsContent)
iferr!=nil {
log.Fatal(err)
}
fmt.Println("Status:", smsResponse.Messages[0].Status)
}
Where To Go From Here?
The next change you can make to this is to make the file a little more secure by removing the hardcoded API key, API secret, and the phone numbers.
A good way to do this is to move them to environment variables that are stored in a .env file.
Try implementing this using the godotenv package and quickly shore up your security.
Further Reading
If sending an SMS with Go has go you exicted about what other communication elements you could be adding to your application then take a look at the examples on the nexmo-go GitHub repository.
There you’ll find code for using many other aspects of the Nexmo API such as making phone calls, receiving SMS messages and verifying phone numbers.
You will likely want to set up a virtualenv first and complete the following steps inside it.
Install requirements:
pip install -r test-requirements.txt
Run tests:
python -m unittest discover
(The run_tests.sh script does both of these automatically)
By default, the test suite verifies behavior locally using dummy services.
If you want to run tests live against your real camera, connect to the camera’s
wireless access point and set the TEST_LIVE_CAMERA environment variable.
For example:
TEST_LIVE_CAMERA=1 python -m unittest discover
CAUTION: Use with your camera at your own risk. This is free software that offers no warranty. For details, see LICENSE.
Usage
simple example:
>>> api = pysony.SonyAPI()
>>> api.getAvailableApiList()
Este projeto em C# foi desenvolvido para monitorar e organizar os acessos de usuários a uma página web. O sistema processa um arquivo JSON contendo registros de acessos e exibe os acessos distintos e agrupados por data.
💻 Descrição
O User Access Watcher System lê um arquivo JSON com informações de usuários e suas respectivas datas de acesso a uma página. Ele permite exibir usuários que acessaram em dias específicos e organiza essas informações em uma estrutura que destaca acessos únicos por dia. O sistema também gera relatórios detalhados de acessos distintos e por data, utilizando funcionalidades de manipulação de coleções em C#.
🔮 Funcionalidades
Leitura de Arquivo JSON: O sistema lê e desserializa um arquivo JSON contendo acessos de usuários, armazenando os dados em uma lista de objetos.
Acessos Únicos: Utiliza um HashSet para garantir que apenas acessos únicos sejam contabilizados e exibidos.
Organização por Data: Os acessos são agrupados e exibidos por data, usando um dicionário (Dictionary) que mapeia a data para os usuários que acessaram nesse dia.
Exibição Detalhada: O sistema exibe tanto os acessos únicos como o agrupamento de acessos por dia no console.
🛠️ Estrutura do Código
Classe UserAccess: Representa um acesso de usuário, contendo as propriedades username (nome do usuário) e access_date (data do acesso).
Classe Program: Classe principal que contém a lógica de leitura do arquivo JSON, processamento dos dados, e exibição de informações.
Manipulação de Coleções: O projeto usa HashSet para eliminar duplicatas e Dictionary para mapear os acessos por data, facilitando a organização e visualização.
Pilares de POO Utilizados
📁 Estrutura do JSON
O arquivo user-access.json deve seguir este formato:
Ao rodar o sistema, o programa processa o arquivo JSON e exibe:
A lista de usuários que acessaram em dias distintos, sem duplicatas.
O número total de acessos únicos.
Um relatório detalhado dos acessos por data, com os nomes de usuários que acessaram em cada dia.
Exemplo de saída no console:
────── Users accessed on day (distinct):
brendon_gomes
john_doe

Total users access in days (distinct): 2

────── Access Dates
┌──── Access in 29/09/2024 ───
├─ brendon_gomes
├─ john_doe
└─────────────────────────────