A SwiftUI app to help coffee drinkers optimize their sleep schedules using CoreML.
Overview
BetterRest is an iOS app built with SwiftUI and CoreML. It uses machine learning to recommend optimal bedtimes based on user input, including wake-up time, desired sleep duration, and daily coffee consumption.
The app demonstrates the power of tabular regression in CoreML to process billions of potential input combinations and generate personalized recommendations.
Features
Customizable Sleep Recommendations: Input wake-up time, sleep duration, and coffee intake to get tailored bedtime suggestions.
CoreML Integration: Utilizes machine learning models trained with tabular regression to predict sleep patterns.
SwiftUI Interface: Clean and responsive UI for seamless user interaction.
Technologies Used
Swift
SwiftUI
CoreML
Disclaimer
This is a sample project created to demonstrate the use of CoreML within a SwiftUI app. The predictions and recommendations provided are not scientifically accurate and should not be taken seriously.
How It Works
Users provide three inputs:
Wake-up time
Desired hours of sleep
Number of cups of coffee consumed daily
The app processes the inputs using a Core ML model trained with sleep pattern data.
A recommended bedtime is displayed to the user.
Acknowledgments
This project idea was originally proposed as part of the 100 Days of SwiftUI course by Paul Hudson. The course provided the initial concept and guidance for implementation.
Notes for Reviewers
This project is part of my exploration of SwiftUI and CoreML, showcasing practical machine learning integration. Feedback is welcome! 😊
Thank you for reviewing this project! Feel free to reach out for questions or suggestions. 😊
Note: this code of conduct is in the process of being deprecated. The new one (under development) is located here: Seanpm2001 Code of Conduct
Contributor Covenant Code of Conduct
Our Pledge
We as members, contributors, and leaders pledge to make participation in our
community a harassment-free experience for everyone, regardless of age, body
size, visible or invisible disability, ethnicity, sex characteristics, gender
identity and expression, level of experience, education, socio-economic status,
nationality, personal appearance, race, religion, or sexual identity
and orientation.
We pledge to act and interact in ways that contribute to an open, welcoming,
diverse, inclusive, and healthy community.
Our Standards
Examples of behavior that contributes to a positive environment for our
community include:
Demonstrating empathy and kindness toward other people
Being respectful of differing opinions, viewpoints, and experiences
Giving and gracefully accepting constructive feedback
Accepting responsibility and apologizing to those affected by our mistakes,
and learning from the experience
Focusing on what is best not just for us as individuals, but for the
overall community
Examples of unacceptable behavior include:
The use of sexualized language or imagery, and sexual attention or
advances of any kind
Trolling, insulting or derogatory comments, and personal or political attacks
Public or private harassment
Publishing others’ private information, such as a physical or email
address, without their explicit permission
Other conduct which could reasonably be considered inappropriate in a
professional setting
Enforcement Responsibilities
Community leaders are responsible for clarifying and enforcing our standards of
acceptable behavior and will take appropriate and fair corrective action in
response to any behavior that they deem inappropriate, threatening, offensive,
or harmful.
Community leaders have the right and responsibility to remove, edit, or reject
comments, commits, code, wiki edits, issues, and other contributions that are
not aligned to this Code of Conduct, and will communicate reasons for moderation
decisions when appropriate.
Scope
This Code of Conduct applies within all community spaces, and also applies when
an individual is officially representing the community in public spaces.
Examples of representing our community include using an official e-mail address,
posting via an official social media account, or acting as an appointed
representative at an online or offline event.
Enforcement
Instances of abusive, harassing, or otherwise unacceptable behavior may be
reported to the community leaders responsible for enforcement at
.
All complaints will be reviewed and investigated promptly and fairly.
All community leaders are obligated to respect the privacy and security of the
reporter of any incident.
Enforcement Guidelines
Community leaders will follow these Community Impact Guidelines in determining
the consequences for any action they deem in violation of this Code of Conduct:
1. Correction
Community Impact: Use of inappropriate language or other behavior deemed
unprofessional or unwelcome in the community.
Consequence: A private, written warning from community leaders, providing
clarity around the nature of the violation and an explanation of why the
behavior was inappropriate. A public apology may be requested.
2. Warning
Community Impact: A violation through a single incident or series
of actions.
Consequence: A warning with consequences for continued behavior. No
interaction with the people involved, including unsolicited interaction with
those enforcing the Code of Conduct, for a specified period of time. This
includes avoiding interactions in community spaces as well as external channels
like social media. Violating these terms may lead to a temporary or
permanent ban.
3. Temporary Ban
Community Impact: A serious violation of community standards, including
sustained inappropriate behavior.
Consequence: A temporary ban from any sort of interaction or public
communication with the community for a specified period of time. No public or
private interaction with the people involved, including unsolicited interaction
with those enforcing the Code of Conduct, is allowed during this period.
Violating these terms may lead to a permanent ban.
4. Permanent Ban
Community Impact: Demonstrating a pattern of violation of community
standards, including sustained inappropriate behavior, harassment of an
individual, or aggression toward or disparagement of classes of individuals.
Consequence: A permanent ban from any sort of public interaction within
the community.
Dynamic 3D display for your currently playing song on Last.fm
Ascent is a site I made to display your currently playing song from Last.fm in a rendered 3d scene with custom shaders. I learned a lot through building this project about authentication, fetching data, managing state, and tying together a backend/frontend.
You will need Node.js and git to run this project locally
Installing
git clone https://github.com/Kalmarv/ascent/
cd ascent
npm install
Environment Variables
You will need a Last.fm api key, you can get one here
create a .env.local file and add the key you created
LASTFM_KEY=YOUR_KEY
After that you can spin up the dev server
npm run dev
Project Info
I originally built a version of this site using the Spotify web api, which had users connect to the app through Spotify, but in the end Spotify denied my quota extension due to their restrictions on how album art is displayed. That’s a real shame, because I’m sure there’s way more people that would use the site if it was just Spotify, instead of Last.fm, as many more people have a Spotify account than a Last.fm account set up.
The advantage of using last.fm is there are more sources that it can connect to, for example I have a home server running Navidrome which is connected to my last.fm account and can display albums from there.
Architecture
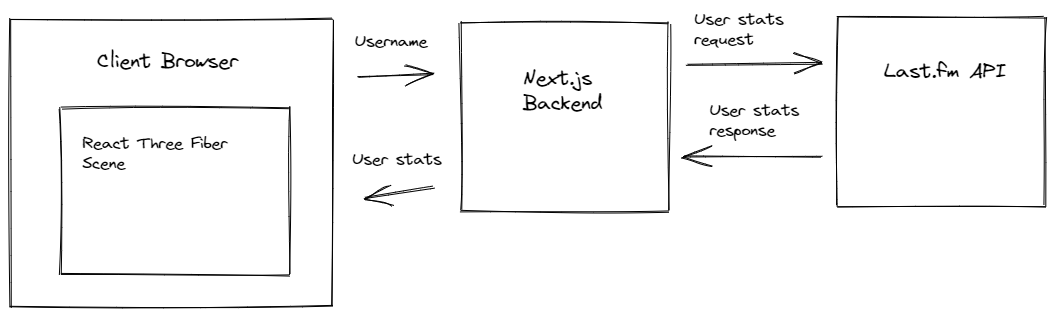
The user enters their username on the site, which will send them to the page with the react-three-fiber renderer, and also send a post request to the backend with their last.fm username.
When the backend receives the post request, it will send a get request to the Last.fm web api with their username to get their currently (or last played) song. I used a backend for this because the Last.fm api needs a secret for the request. I loaded this as an environment variable so that it is never exposed to the end user, or the code on GitHub.
Once the backend gets the response from Last.fm it sends it back to the client, with the relevant information. This info is then used as props in the react-three-fiber scene.
Challenges
Next.js hybrid SSR/CSR
I didn’t have a great understanding of the architecture of Next.js apps, and their various rendering options, which caused issues with the canvas being not defined on reload, but it worked fine on initial loading. I learned about dynamic imports and was able to use that to render the scene without Next trying to SSR it.
State Management
I wanted users to be able to customize various settings to control how the scene looked from the Tweakpane panel, and also persist those settings to local storage so the scene would look the same on reload. I had a lot of issues keeping the settings, GUI controls, and actual settings being applied to the scene in sync. This was exacerbated by the fact that multiple components had to be updated from Tweakpane. I eventually settled on having the controls not update the scene directly, but instead a Zustand store. The components then get their settings from the store. On loading the page, Zustand first checks for settings saved to local storage and sets those settings as the default.
This module will build a multiple machine Hyper-V Lab environment from an XML
configuration file and other optional installation scripts.
Introduction
While studying for some of my Microsoft certifications I had a need to quickly
and easily spin up various Hyper-V Lab environments so that I could experiment
with and learn the technologies involved.
Originally I performed this process manually, creating Hyper-V VM’s and environments
to suit. But as the complexity of the Lab environment increased (e.g. take
multi-tier PKIs) manually building these Labs became unmanageable. Also, if I
wanted to repeat a particular process multiple times I would have to either
snapshot multiple VMs or manually back them all up. This quickly became
unsupportable as snapshots slows VMs down and constant backups of large Hyper-V
environments was slow and also limited by space. This gave me a basic set of
requirements for this module.
So as a solution to these problems I decided that I wanted a declarative
approach to automating the process of building a Lab environment.
This had the following advantages:
Building a new Lab with multiple VMs was automated.
Creation of the actual Lab VMs could be done without supervision.
Once a basic Lab was created more complex Lab environments could be created by
cloning the original XML configuration and tailoring it.
Configuration files could be distributed easily.
Because the post setup configuration of the Lab VM machines was performed via
DSC this gave me an opportunity to work with DSC to a greater depth.
The configuration files could be created by people without knowledge of PowerShell
or DSC.
UI based applications could be easily created to generate the configuration XML.
Goals
The general goals of this module are:
One-Click Create: Enable “one-click” creation of a Hyper-V Lab environment.
Easy Configuration: Enable non-developers to easily define Lab environments.
Multiple Labs: Support multiple Lab environments on the same Hyper-V host.
Stretched Labs: Allow a Lab environment to span or be installed on a remote
Hyper-V host.
Lab Isolation: Ensure that multiple Lab environments are completely isolated
from each other.
Minimal Disk Usage: Minimize Lab footprint by utilizing differencing disks
where possible.
Configuration Flexibility: Allow GUI based tools to be easily created to
create Lab configurations.
Extensible: Enable new Lab VM machine types to be configured by supplying
different DSC library resources.
Requirements
To use this Module you will require on your Lab Host:
Operating Systems supported and automatically tested:
Windows Server 2019
Operating Systems that should work but are not automatically tested:
Windows Server 2012
Windows Server 2012 R2
Windows Server 2016
Windows Server 2016, version 1709
Windows Server 2016, version 1803
Windows Server 2022
Windows 8.0
Windows 8.1
Windows 10
Windows Management Framework 5.1 (WMF5.1) installed.
WMF 5.1 is installed on Windows 10 and Windows Server 2016 out of the box,
but for Windows Server 2012/R2 and Windows 8/8.1 it will need to be
installed separately.WMF 5.1 can be downloaded from here.
PowerShell Core 6/PowerShell 7: Untested, but may work.
Hyper-V available (which requires intel-VT CPU support).
To use labs that contain Nested Hyper-V hosts only Windows 10 built 10586
or later and Windows Server 2016 TP3 or later are supported.
Copies of the Windows installation media for any Operating Systems
that will be used in your Labs.
Note: Most Lab configuration files can contain a URL where the relevant
trial media can be downloaded from, but you can use any Windows Install
Media source you choose (including custom built ISOs).
An internet connection to download the WMF 5.1 MSU and any other
optional MSU packages required by the Lab.
Note: This only needs to be done during the Install-Lab phase and can
be disabled after this phase is complete.
WS-Man enabled to allow communication with the Lab Virtual Machines.
Note: if WS-Man is not enabled, the Install-Lab cmdlet will attempt to
install it with confirmation being required from the user.
Confirmation can be suppressed using the -force option.
Contributing
If you wish to contribute to this project, please read the Contributing.md
document first. We would be very grateful of any contributions.
Basic Usage Guide
The use of this module is fairly simple from a process standpoint with the bulk
of the work creating a Lab going into the creation of the configuration XML that
defines it. But if there is a Lab configuration already available that fits your
needs then there is almost nothing to do.
A Lab consists of the following items:
A configuration XML file that defines the Virtual Machines, Switches, the DSC
config files and anything else related to how the Lab is set up.
Copies of the Windows Operating System Images used in the Lab which are:
Either VHDs containing Syspreped Windows images.
Or Windows Installation media ISO files (these will be automatically converted
to VHDs for you during Lab creation).
Any DSC configuration files that are used to configure the Lab VMs after the OS
initial start up has completed.
There are a library of DSC configuration files for various machine types already
defined and available for you to use in the DSCLibrary folder.
Installing the LabBuilder Module
The easiest way to download and install the LabBuilder module is using PowerShell
Get to download it from the PowerShell Gallery:
Install-Module-Name LabBuilder
PowerShell Get is built into Windows Management Framework 5.1, which is a
requirement of this project, so it should already be installed onto your host.
If it is not installed, download it from here.
Installing a Lab
Once the Lab files are available the process of installing the Lab is simple.
Make a folder where all your Lab files will go (e.g. VMs, VHDs, ISOs,
scripts) – e.g. c:\MyLab
Copy the Lab Configuration XML file into that folder (try one of the sample
configurations in the Samples folder).
Edit the Lab Configuration XML file and customize the Settings to suit
(specifically the LabPath setting).
Make a folder in your Lab folder for your Windows ISO files called
isofiles – e.g. c:\MyLab\ISOFiles
Copy any ISO files into this folder that your lab will use.
Make a folder in your Lab folder for your VHD boot templates (converted from
the ISO files) vhdfiles – e.g. c:\MyLab\VHDFiles
Run the following command in an Administrative PowerShell window:
This will shutdown any running Virtual Machines in the Lab in Reverse Boot Order,
starting with Virtual Machines that have no boot order defined.
LabBuilder will wait for all machines with the same Boot Order to be shut down
before beginning shut down of VMs in the next lowest Boot Order.
Any Lab Virtual Machine that has already been stopped will be ignored.
Note: Boot Order is an optional attribute defined in the Lab Configuration that
controls the order Lab Virtual Machines should be booted in.
You can of course just shut down the Virtual Machines in a Lab yourself via
Hyper-V (or some other mechanism), but using Stop-Lab ensures the Virtual Machines
are shutdown in a specific order defined in the Lab (e.g. Domain Controllers shut
down last).
Starting a Lab
Once the Lab has been installed and then stopped, it can be started back up using
this PowerShell command:
This will start up any stopped Virtual Machines in the Lab in Boot Order,
with Virtual Machines that have no boot order defined being started last.
LabBuilder will wait for all machines with the same Boot Order to be started up
fully before beginning start up of VMs in the next highest Boot Order.
Note: Boot Order is an optional attribute defined in the Lab Configuration that
controls the order Lab Virtual Machines should be booted in.
You can of course just start up the Virtual Machines in a Lab yourself via
Hyper-V (or some other mechanism), but using Start-Lab ensures the Virtual Machines
are started up in a specific order defined in the Lab (e.g. Domain Controllers
started up first).
ISO Files
During the Install process of a Lab, if the template VHD files to use as boot
disks for your VMs, LabBuilder will attempt to convert the required ISO files
into VHD boot disks for you.
This will only occur if the ISO files required to build a specific VHD file are
found in the ISO folder specified by the Lab.
By default LabBuilder will look in the isofiles sub-folder of your Lab folder
for any ISO files it needs.
You can change the folder that a Lab looks in for the ISO files by
changing/setting the isopath attribute of the
node in the configuration
If it can’t find an ISO file it needs, you will be notified of an official
download location for trial or preview editions of the ISO files (as long as
the LabBuilder configuration you’re using contains the download URLs).
Important: If you are converting Windows Server 2016 ISO files or adding
packages to VHDs please see the [Windows Server 2016](#Windows Server 2016) section.
Multiple VHD templates may use the same ISO file in a Lab.
For example, if multiple editions of an Operating system are used in the same lab.
Once an ISO has been converted to an VHD, it will be stored in the VHDFiles
folder in your lab folder.
However, if you are using multiple Labs on the same machine you might want to
share these VHD files between mutlpile Lab projects to save having to build
and store copies for each Lab.
In that case, you can set the vhdpath attribute of the <templatevhds> node
in the configuration to a different relative or absolute path.
The conversion process for a single ISO to VHD can take 10-20 minutes depending
on your machine.
For this reason multiple Labs can be configured to use the same path to store
these VHDs by changing the vhdpath attribute of the <templatevhds> node
in the configuration.
Windows Server 2016
If you are converting a Windows Server 2016 image and your Lab Host is running either:
Windows Server 2012 R2 or older
Windows 8.1 or older
Important: Only Windows Server 2016 Technical Preview 5 and above are
supported with LabBuilder.
You will need to install an updated version of the DISM before you will be able
to add any packages to a Windows Server 2016 ISO.
This includes building Nano Server Images.
You can get the latest version of the DISM by downloading and installing the
Windows ADK.
After installing the Windows ADK, you can force LabBuilder to use this version
by configuring the “dismpath” attribute in the “settings” element of your
LabBuilder configuration file:
When a new Lab is installed onto a Lab Host from a configuration file, LabBuilder
performs the following tasks (in order):
Load Config: The Lab configuration file is Loaded and validated.
If the Lab Configuration file is invalid it will be rejected and the Lab
will not be installed.
Create Lab Folder: A folder on the Lab Host is created to store the Lab
files (VM Templates, VMs, Resources etc.).
The user specifies the location of this folder in the Lab Configuration file
or by passing the LabPath parameter to the Install-Lab cmdlet.
Download Modules: All Module Resources listed in the Lab Configuration
are downloaded to the PowerShell Modules folder if they don’t already exist.
Download MSUs: All MSU Resources listed in the Lab Configuration are
downloaded to the Resources folder in the Lab folder if they don’t already
exist.
Create Lab Switches: Each Virtual Switch specified in the Lab
Configuration is created or updated in Hyper-V.
Create Management Switch: A Management Internal Virtual Switch is created
in Hyper-V for this Lab.
Each Lab has it’s own Management Internal Virtual Switch which will be named
“Lab Management” with the Lab ID prepended to it.It will be assigned a VLAN Id of 99, which can be overridden in the Lab
Configuration file.The Lab Management switch is for the Lab Host to communicate with the Lab
Guest Virtual Machines so must not be removed.
Create Template VHDs: Any Template VHD files that don’t exist but should
are created from the appropriate ISO files.
A Lab Configuration file may not list any Template VHD files, or it may list
them but not specify source ISO files to create the VHD files from.Instead the Templates may directly link to a VHD file or an existing Hyper-V
Virtual Machine.
Create VHD Templates Folder: A folder within the Lab folder will be
created to store the Virtual Hard Disk Template files.
This folder is usually called ‘Virtual Hard Disk Templates’.This folder will be used to store Template VHD files or Differencing Disk
Parent VHD files for use as a Boot Disk for Lab Virtual Machines.A VHD file in this folder can be used as a Template or a Differencing Disk
Parent or both.
Copy VHD Templates: Get the list of Templates in the Lab Configuration
and copy the VHD specified to the Lab Virtual Hard Disk Templates folder.
Any packages listed in the Template will be applied to the Template at this point.A Template VHD file will only be copied into this folder if it does not already
exist.The Template VHD file will also be optimized in this folder and then marked as
Read Only to ensure it is not changed (as it may be used as a Differencing Disk
Parent).
Create Virtual Machines: Create the Lab Virtual Machines, one at a time,
for each one performing the following steps:
Create Hyper-V VM: Create the Virtual Machine and attach any Network
Adapters listed in the Lab Configuration with it.
Create Boot VHD: Copy (if not using a Differencing Boot VHD) the Boot
VHD from the Virtual Hard Disk Templates folder and attach it to the VM.
Add Packages: Add any listed packages to the VM.
Create Data VHDs: Copy/Create and attach any Data VHDs listed in the
Lab Configuration with the VM.
Create Config Files: Create any VM configuration files required for
first boot of the VM (e.g. Unattend.xml, SetupComplete.cmd) and copy them
into the Boot VHD.
Boot VM: Boot the VM for the first time and wait for Initial Setup of
the VM to complete.
Create Certificate: A Self-Signed certificate will be created by the
VM and made available on the VM Boot VHD.
Download Certificate: The Self-Signed certificate will be downloaded
by the Lab Host and used to encrypt the credentials in the DSC MOF file
that will be created.
Create DSC Configuration: The DSC Configuration file will be assembled
from the speficied DSC Configuration and the required networking information.
Compile DSC Configuration: The DSC Configuration file will be compiled
and a MOF file produced.
Upload DSC Files: This DSC MOF file, DSC LCM (Meta) MOF File and any
DSC Resource Modules required will be uploaded into the VM.
Start DSC: DSC configuration will be started on the VM.
Note: The LCM is configured to re-apply DSC every 15 minutes, so changing
any settings managed by DSC on the server will be reverted within 15 minutes
of them being changed.
The entire process above is automated.
As long as you a valid Lab Configuration file and any required Windows Installation
Media ISO files then the Lab will be installed for you.
Depending on the size of the Lab you are building and whether or not the ISO files
need to be converted to VHD files, this could take from 5 minutes to many hours.
For example, an Lab containing eight Windows Server 2012 R2 Virtual Machines
configured as an AD Domain containing various services installed on a Host with
four CPU cores, 32 GB RAM and an SSD will take about 45 minutes to install.
Windows Management Framework 5.1 (WMF 5.1)
All Lab Guest Virtual Machines must have WMF 5.1 installed onto them before they
are first booted in a Lab environment. This is to ensure the Self-Signed certificate
can be generated and returned to the host for DSC MOF encryption.
If WMF 5.1 is not installed before the Lab VM Guest first boot then DSC
configuration will not proceed, and the Lab Guest VM will boot with a clean OS,
but none of the specific features installed or configured (e.g. DC’s not promoted).
WMF 5.1 is only required to be installed onto Windows 7, 8 and 8.1 or Windows
Server 2008 R2, Windows Server 2012 and Windows Server 2012 R2. Windows 10 and
Windows Server 2016 already include WMF 5.1 so it doesn’t need to be installed.
Most Labs are configured to install WMF 5.1 completely automatically so you
don’t need to install worry about it.
Note: It is possible to change a Lab Configuration file to prevent automatic
installation of the WMF 5.1 MSU package onto Guest Lab VM’s, but this is not
recommended unless there is a good reason for doing so.
LabBuilder supports automatically installing any MSU package that can be downloaded
from the internet onto the Lab Guest VMs during installation of the Lab.
These MSU packages can be installed during any of the following phases of Lab installation:
Convert Windows Install Media ISO to Template VHD.
Copy Template VHD to ParentVHD folder in Lab.
Create new VM Boot VHD from ParentVHD folder in Lab.
By default, Lab configuration files are configured to ensure WMF 5.1 is installed
at each of the above phases.
The WMF 5.1 MSU package is controlled by adding a new MSU element to the
<Resources> element in a Lab Configuration.
E.g.
This defines the name of the MSU package and the Download location.
The package can then be added to the <Template>, <TemplateVHD> or
<VM> element in the Packages attribute.
E.g.
<templatevhdname="Windows Server 2012 R2 Datacenter Full"iso="9600.17050.WINBLUE_REFRESH.140317-1640_X64FRE_SERVER_EVAL_EN-US-IR3_SSS_X64FREE_EN-US_DV9.iso"url="https://www.microsoft.com/en-us/evalcenter/evaluate-windows-server-2012-r2"vhd="Windows Server 2012 R2 Datacenter Full.vhdx"edition="Windows Server 2012 R2 SERVERDATACENTER"ostype="Server"packages="WMF5.1-WS2012R2-W81"vhdformat="vhdx"vhdtype="dynamic"generation="2"vhdsize="40GB" />
Other MSU packages can also be installed in the same way.
Multiple MSU Packages can be installed to the same VHD by comma delimiting the
Packages attribute.
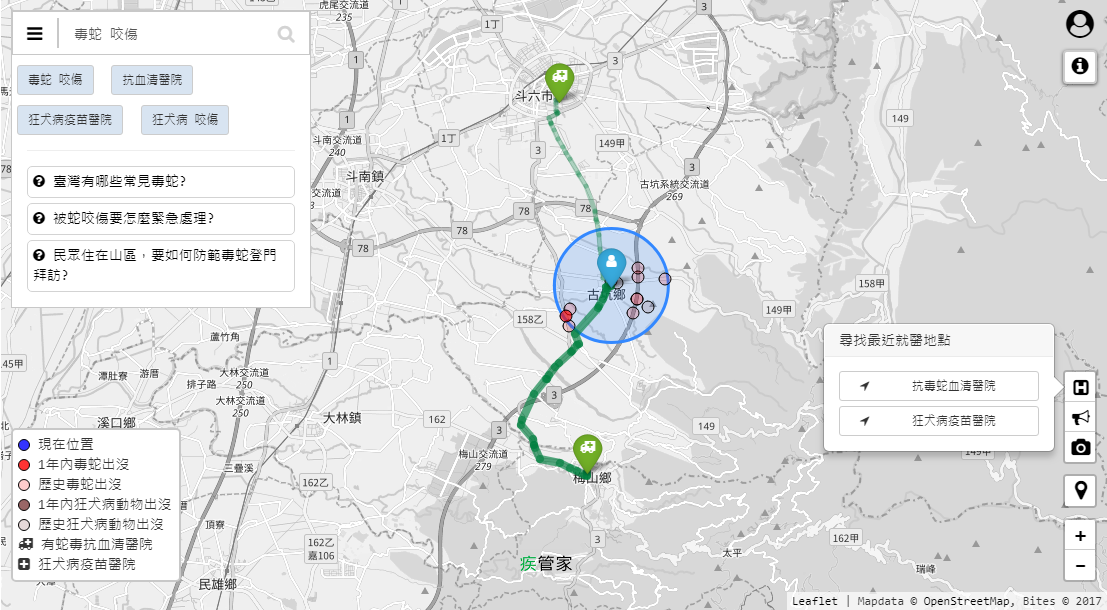
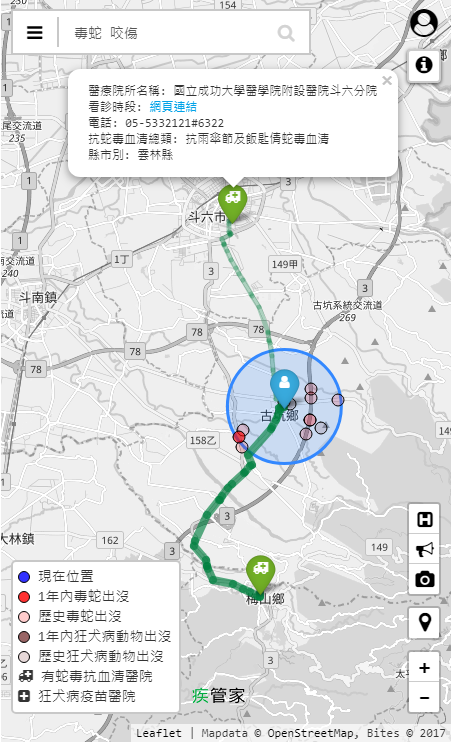
Bites project is the open source for GIS with AI image recognition for providing residents with information of snake and rabies-infected animals.
View
Desktop View
Mobile View
Start the service.
Clone the Reposiroty
cd~
git clone https://github.com/jiankaiwang/bites.git
cd ./bites
Preparation
Add and edit the configuration file (named sysconfig.js) under path configure.
/* * secret information */exports.sysconf={"umap_version" : "0.0.1","availableLang" : "en zh_TW","defaultLang" : "zh_TW","site_description" : "Bites project is the open source for GIS with AI image recognition for providing residents with information of snake and rabies-infected animals. ","error_emails_to" : "null","api_allow_host" : "localhost 127.0.0.1","use-redis": false,"redisServer": {"host": "","port": 6379,"password": "","ttl": 260}};exports.recaptcah={sitekey: "(recaptcah-sitekey)",secretkey: "(recaptcah-secretkey)"}exports.googleapikey={"geocoding": "(google geocoding api)"}// you can change between develop and operation modeexports.env={"mode": "dev","url": {"dev": "http://localhost:8080","ops": "https://xxx.example.com"}}exports.params={"rabies_history_peroid_year": 3,"snake_history_peroid_year": 3,"grid_meter": 250}
Deployment
npm install --save
sudo npm start
Service
Establish the service by adding the script to /etc/systemd/system/bites.service
Check service status: sudo systemctl status bites.service, automatically start the service after rebooting sudo systemctl enable bites.service and start/stop the service sudo systemctl start|stop bites.service.
Allow nopasswd commands running the service to build in CI/CD tools (using Jenkins as ci/cd tool). Edit the file /etc/sudoers.d/90-cloud-init-users.
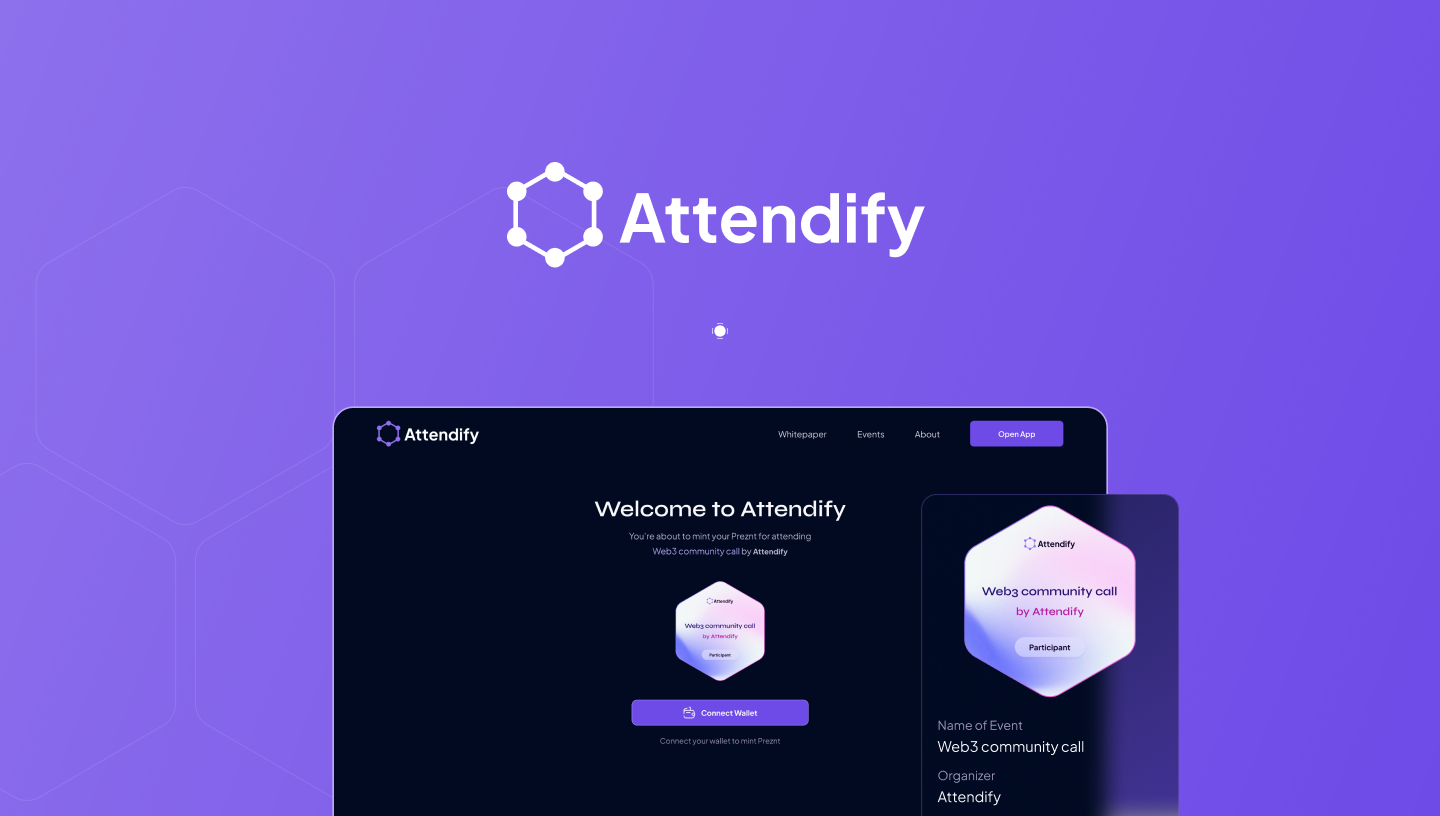
Attendify has developed a Proof of Attendance Protocol (POAP).
Proof of Attendance Protocol are modern badges or identifiers known as Prezents that authenticate the participatory actions of a person at an event or activity. After the closure of events, some form of badges, identity cards, or certificates are issued to people for their participation in that event. All of these identifiers go well to show the zeal committed by individuals to the success of that event.
With the Attendify system coming to the fore, this proof of attendance brought into the blockchain ecosystem makes it easier to issue certificates or badges to individuals who participate in events such as hackathons, summits, and livestreams. For instance, in 2019, the POA system was used at ETHDenver. This issuance gives a long-lasting memory of peoples’ participation in an event that redefines the dignity of man.
This product allows for easy minting of NFTs from just a click. This form of minting is thereafter confirmable on the Polygon network. The process of minting begins with users identifying the images, videos, or other media content to have on the network. After it has been uploaded to the IPFS which is going to be integrated into the web application, Attendify allows one click for successful mint.
Use case
Prezents as incentives
Attendify is designed to address problems with attendance, reliable records and distribution of rewards
Encourage learners/ participants to attend more often, thus resulting in an improved retention rates for such organisation
Allows event organisers to track progress and attendees easily, such information useful for marketing and promotions.
Community members benefit from reputation and incentive reward by taking part in communities with a track record.
Event organisers, often a time, are marvelled when their anticipated events happen. Hosting events requires much more effort to thrive; the time to plan, the ideation period, the tension that follows each day as the date of the event approaches, and the unfolding heat of the D-day. Every time and moment, for the event organisers, are precious and for this reason, having Attendify’ prezents gives event organisers the feel of accomplishment.
Attendify hopes to serve as an identity of one’s presence in an occasion. This, for event planners and organisers, is a certification of accomplishment. The prezents issued through the form of a minted NFT, authenticates that their sleepless nights and unflinching efforts for the success of the events will not easily slide off their minds. It also does establish the abilities of the event organisers to hold more successful events with high hopes and less fears.
HOW DO EVENT ORGANISERS USE ATTENDIFY?
Event organisers who hope to issue out prezents to their beloved speakers, guests, and attendants simply have to go to the Attendify webpage to create a link. The Attendify user interface is made so simple to navigate and create prezents for one’s event. All that is required is a wallet and details about the events; a link to the prezents is generated, which the event organisers make available to their attendants before or after the events to mint their prezents.
Building communities requires a kind of recognition for community’s participation; this proof of attendance or participation can serve as a method of recognition.
Attendify prezent tokens can serve as incentives to participants and attendees of various events. In addition, they can be useful in tracking attendance in the case of accountability or future reference. The utility of these tokens extends beyond participating in events.
Attendify is designed to solve issues of event attendance and accountability, reward distribution and verifiable records, having a verifiable record stored on the blockchain will help prove which party is correct in their assertion in cases of dispute.
The tokens can be distributed by organisations that run seminars and workshops to their participants. This will motivate learners and encourage them to attend more frequently, thus resulting in improved retention rates for the company running these events.