Blog

  • url_shortener

    URL Shortener URL Instructions

    If you want to build the next bit.ly, goo.gl, or ow.ly yourself. Here are a project you might consider to start.

    URL Shortener is a URL shortening service where you enter a URL such as https://codesubmit.io/library/react and it returns a short URL such as http://short.est/GeAi9K.

    Simply ensure that a URL can be encoded into a short URL and that the short URL can be decoded back into the original URL.

    Installation

    Following those steps below for install project:

    git clone https://github.com/lytrungtin/url_shortener.git
    • Go to project folder
    cd url_shortener
    • Copy env values file from example
    cp .env.example .env
    cp config/database.yml.sample config/database.yml
    • Bundle install
    bundle install
    • Prepare database
    rails db:reset
    • Run tests
    rails test
    • Starting backend server
    rails server

    Open new tab of terminal to begin frontend running.

    • Install node modules required for web frontend
    npm install
    • Starting web frontend application
    npm run start

    URL Shortener

    Description:

    Nobody likes an impossibly long URL.

    They’re hard to decipher. But sometimes, between a deep directory structure on a site, plus a large number of parameters tacked on to the end, URLs just begin to get unwieldy. And back in the days before Twitter added their own link shortener to their service, a long URL meant taking precious characters away from your tweets.

    Today, people use link shorteners for a slew of reasons. They can make it much easier to type, or remember, an otherwise lengthy bare URL. They can bring a consistent branding to a social media account. They make it easier to perform analytics across a group of URLs. They make it possible to provide a consistent entryway to a URL that may change frequently on the other side.

    There are some challenges to URL shorteners, to be sure. They make it challenging to figure out where a link is actually taking you before you click, and they’re vulnerable to linkrot, should the service providing the short URL for you ever disappear. But despite these challenges, URL shorteners aren’t going anywhere anytime soon.

    But with so many free link shortening services out there, why roll your own? In short: control. While some services will let you pick your own domain to use, sometimes, that’s about the level of customization you’re going to get. With a self-hosted service, you decide how long your service operates for. You decide what format your URLs take. You decide who has access to your analytics. It’s yours to own and operate as you please.

    (Jason Baker, Want to build your own URL shortener?)

    • Two endpoints are provided:
      • /encode: Encodes a URL to a shortened URL
      • /decode: Decodes a shortened URL to its original URL
    • Here is Postman collection you can download:
    • Links to demo instances
    • The project uses the latest optimization versions from Rails, React

    Screenshot from web frontend:

    img.png

    API endpoints Usage

    Valid request to /encode endpoint:

    POST /api/v1/url/encode
    
    {
      "url": {
        "original_url": "https://codesubmit.io/library/react"
      }
    }

    Body success response from /encode endpoint:

    200 OK
    
    {
      "status": true,
      "data": [
        {
          "shortened_url": "http://localhost:3000/rxjODc"
        }
      ]
    }

    Invalid request to /encode endpoint:

    POST /api/v1/url/encode
    
    {
      "url": {
        "original_url": "https://google.com/something_wrong"
      }
    }

    Body failure response from /encode endpoint:

    422 Unprocessable Entity
    
    {
      "status": false,
      "errors": [
        "Original url is invalid"
      ]
    }

    Valid request to /decode endpoint:

    POST /api/v1/url/decode
    
    {
        "url": {
            "shortened_url": "http://localhost:3000/rxjODc"
        }
    }

    Body success response from /decode endpoint

    200 OK
    
    {
      "status": true,
      "data": [
          {
              "original_url": "https://codesubmit.io/library/react"
          }
      ]
    }

    Invalid request to /decode endpoint

    POST /api/v1/url/decode
    
    {
        "url": {
            "shortened_url": "https://codesubmit.io/this_is_not_shortened_url"
        }
    }

    Body failure response from /decode endpoint

    422 Unprocessable Entity
    
    {
        "status": false,
        "errors": [
            "Shorten URL is not valid"
        ]
    }

    Known issues:

    • Potential issues:

      • Users can exploit Xkcd 1171 to insert malicious URLs into our endpoints. The Ruby standard library already comes with an URI parser, accessible via URI.parse.
      • Users can also pass links with vulnerable to Link rot, An HTTP client for Ruby Net::HTTP provides a very powerful library. Net::HTTP is designed to work with URI. Finally, I will check if the request was successful or will be redirected to another url.
      • Rails provides an API to create custom validations. We will use this to build a URL validator that.
      • Also, the original url should not be from current host. Which only for shortened url.
      • The validator code below is being placed in app/validators/url_validator.rb
    • Scalability issues:

      • The project uses Net:HTTP to get request from other sites a lot.
      • In addition to queries database, Take full advantage of Rails’ built-in action, page and fragment caching.
      • Use memcache to cache results that you’d otherwise pull from your database or request info from urls.
      • In addition to using database to store slugs along original urls, we can generate them to html, json, yaml.
      • Implement use RDMS less, fully change to Redis for storing. Remove database connection for all requests.
      • Reconfiguring the server when accessing it will redirect directly from the file without querying any data from the database.
    • Maintainability:

      • Should implement RSPEC for unit test.
      • Github actions, Heroku pipeline, PR preview env, staging env already installed workflows, and activated package issues security alert bots can proactively inform notifications if dependencies need to be updated or replaced.
    Visit original content creator repository https://github.com/lytrungtin/url_shortener

  • url_shortener

    URL Shortener URL Instructions

    If you want to build the next bit.ly, goo.gl, or ow.ly yourself. Here are a project you might consider to start.

    URL Shortener is a URL shortening service where you enter a URL such as https://codesubmit.io/library/react and it returns a short URL such as http://short.est/GeAi9K.

    Simply ensure that a URL can be encoded into a short URL and that the short URL can be decoded back
    into the original URL.

    Installation

    Following those steps below for install project:

    git clone https://github.com/lytrungtin/url_shortener.git
    • Go to project folder
    cd url_shortener
    • Copy env values file from example

    cp .env.example .env
    cp config/database.yml.sample config/database.yml
    • Bundle install
    bundle install
    • Prepare database
    rails db:reset
    • Run tests
    rails test
    • Starting backend server
    rails server

    Open new tab of terminal to begin frontend running.

    • Install node modules required for web frontend
    npm install
    • Starting web frontend application
    npm run start

    URL Shortener

    Description:

    Nobody likes an impossibly long URL.

    They’re hard to decipher. But sometimes, between a deep directory structure on a site, plus a large number of parameters tacked on to the end, URLs just begin to get unwieldy. And back in the days before Twitter added their own link shortener to their service, a long URL meant taking precious characters away from your tweets.

    Today, people use link shorteners for a slew of reasons. They can make it much easier to type, or remember, an otherwise lengthy bare URL. They can bring a consistent branding to a social media account. They make it easier to perform analytics across a group of URLs. They make it possible to provide a consistent entryway to a URL that may change frequently on the other side.

    There are some challenges to URL shorteners, to be sure. They make it challenging to figure out where a link is actually taking you before you click, and they’re vulnerable to linkrot, should the service providing the short URL for you ever disappear. But despite these challenges, URL shorteners aren’t going anywhere anytime soon.

    But with so many free link shortening services out there, why roll your own? In short: control. While some services will let you pick your own domain to use, sometimes, that’s about the level of customization you’re going to get. With a self-hosted service, you decide how long your service operates for. You decide what format your URLs take. You decide who has access to your analytics. It’s yours to own and operate as you please.

    (Jason Baker, Want to build your own URL shortener?)

    • Two endpoints are provided:
      • /encode: Encodes a URL to a shortened URL
      • /decode: Decodes a shortened URL to its original URL
    • Here is Postman collection you can download:
    • Links to demo instances
    • The project uses the latest optimization versions from Rails, React

    Screenshot from web frontend:

    img.png

    API endpoints Usage

    Valid request to /encode endpoint:

    POST /api/v1/url/encode
    
    {
      "url": {
        "original_url": "https://codesubmit.io/library/react"
      }
    }

    Body success response from /encode endpoint:

    200 OK
    
    {
      "status": true,
      "data": [
        {
          "shortened_url": "http://localhost:3000/rxjODc"
        }
      ]
    }

    Invalid request to /encode endpoint:

    POST /api/v1/url/encode
    
    {
      "url": {
        "original_url": "https://google.com/something_wrong"
      }
    }

    Body failure response from /encode endpoint:

    422 Unprocessable Entity
    
    {
      "status": false,
      "errors": [
        "Original url is invalid"
      ]
    }

    Valid request to /decode endpoint:

    POST /api/v1/url/decode
    
    {
        "url": {
            "shortened_url": "http://localhost:3000/rxjODc"
        }
    }

    Body success response from /decode endpoint

    200 OK
    
    {
      "status": true,
      "data": [
          {
              "original_url": "https://codesubmit.io/library/react"
          }
      ]
    }

    Invalid request to /decode endpoint

    POST /api/v1/url/decode
    
    {
        "url": {
            "shortened_url": "https://codesubmit.io/this_is_not_shortened_url"
        }
    }

    Body failure response from /decode endpoint

    422 Unprocessable Entity
    
    {
        "status": false,
        "errors": [
            "Shorten URL is not valid"
        ]
    }

    Known issues:

    • Potential issues:

      • Users can exploit Xkcd 1171 to insert malicious URLs into our endpoints.
        The Ruby standard library already comes with an URI parser, accessible via URI.parse.
      • Users can also pass links with vulnerable to Link rot,
        An HTTP client for Ruby Net::HTTP provides a very powerful library.
        Net::HTTP is designed to work with URI.
        Finally, I will check if the request was successful or will be redirected to another url.
      • Rails provides an API to create custom validations. We will use this to build a URL validator that.
      • Also, the original url should not be from current host. Which only for shortened url.
      • The validator code below is being placed in app/validators/url_validator.rb
    • Scalability issues:

      • The project uses Net:HTTP to get request from other sites a lot.
      • In addition to queries database, Take full advantage of Rails’ built-in action, page and fragment caching.
      • Use memcache to cache results that you’d otherwise pull from your database or request info from urls.
      • In addition to using database to store slugs along original urls, we can generate them to html, json, yaml.
      • Implement use RDMS less, fully change to Redis for storing. Remove database connection for all requests.
      • Reconfiguring the server when accessing it will redirect directly from the file without querying any data from the database.
    • Maintainability:

      • Should implement RSPEC for unit test.
      • Github actions, Heroku pipeline, PR preview env, staging env already installed workflows, and activated package issues security alert bots can proactively inform notifications if dependencies need to be updated or replaced.

    Visit original content creator repository
    https://github.com/lytrungtin/url_shortener
  • transformers-named-entity-recognition

    Transformer network: Named entity recognition

    We explore an application of the transformer architecture by performing the following tasks:

    • Use tokenizers and pre-trained models from the HuggingFace Library.
    • Fine-tune a pre-trained transformer model for named entity recognition.

    When faced with a large amount of unstructured text data, named entity recognition (NER) can help you detect and classify important information in your dataset. For instance, in the running example “Jane vists Africa in September”, NER would help you detect “Jane”, “Africa”, and “September” as named entities and classify them as person, location, and time, respectively.

    • We use the transformer model to process a large dataset of resumes.
    • We find and classify relevant information such as the companies the applicant worked at, skills, type of degree, etc.

    I did this project in the Sequence Models course as part of the Deep Learning Specialization.

    Dataset

    Our dataset consists of a set of resumes represented in JSON format.

    	content	                                                annotation
    0	Abhishek Jha Application Development Associate...	[{'label': ['Skills'], 'points': [{'start': 12...
    1	Afreen Jamadar Active member of IIIT Committee...	[{'label': ['Email Address'], 'points': [{'sta...
    2	Akhil Yadav Polemaina Hyderabad, Telangana - E...	[{'label': ['Skills'], 'points': [{'start': 37...
    3	Alok Khandai Operational Analyst (SQL DBA) Eng...	[{'label': ['Skills'], 'points': [{'start': 80...
    4	Ananya Chavan lecturer - oracle tutorials Mum...	[{'label': ['Degree'], 'points': [{'start': 20...
    

    An annotation column is essentially a list of pairs of key and value representing the resume content, which may look like:

    [{'label': ['Skills'],
      'points': [{'start': 1295,
        'end': 1621,
        'text': '\n• Programming language: C, C++, Java\n• Oracle PeopleSoft\n• Internet Of Things\n• Machine Learning\n• Database Management System\n• Computer Networks\n• Operating System worked on: Linux, Windows, Mac\n\nNon - Technical Skills\n\n• Honest and Hard-Working\n• Tolerant and Flexible to Different Situations\n• Polite and Calm\n• Team-Player'}]},
     {'label': ['Skills'],
      'points': [{'start': 993,
        'end': 1153,
        'text': 'C (Less than 1 year), Database (Less than 1 year), Database Management (Less than 1 year),\nDatabase Management System (Less than 1 year), Java (Less than 1 year)'}]},
     {'label': ['College Name'],
      'points': [{'start': 939, 'end': 956, 'text': 'Kendriya Vidyalaya'}]},
     {'label': ['College Name'],
      'points': [{'start': 883, 'end': 904, 'text': 'Woodbine modern school'}]},
     {'label': ['Graduation Year'],
      'points': [{'start': 856, 'end': 860, 'text': '2017\n'}]},
     {'label': ['College Name'],
      'points': [{'start': 771,
        'end': 813,
        'text': 'B.v.b college of engineering and technology'}]},
     {'label': ['Designation'],
      'points': [{'start': 727,
        'end': 769,
        'text': 'B.E in Information science and engineering\n'}]},
     {'label': ['Companies worked at'],
      'points': [{'start': 407, 'end': 415, 'text': 'Accenture'}]},
     {'label': ['Designation'],
      'points': [{'start': 372,
        'end': 404,
        'text': 'Application Development Associate'}]},
     {'label': ['Email Address'],
      'points': [{'start': 95,
        'end': 145,
        'text': 'Indeed: indeed.com/r/Abhishek-Jha/10e7a8cb732bc43a\n'}]},
     {'label': ['Location'],
      'points': [{'start': 60, 'end': 68, 'text': 'Bengaluru'}]},
     {'label': ['Companies worked at'],
      'points': [{'start': 49, 'end': 57, 'text': 'Accenture'}]},
     {'label': ['Designation'],
      'points': [{'start': 13,
        'end': 45,
        'text': 'Application Development Associate'}]},
     {'label': ['Name'],
      'points': [{'start': 0, 'end': 11, 'text': 'Abhishek Jha'}]}]
    

    Transformer model

    We tokenize the input using the 🤗 DistilBERT fast tokenizer to match the pre-trained DistilBERT transformer model we are using.

    Visit original content creator repository
    https://github.com/jungsoh/transformers-named-entity-recognition

  • Malicious-Web-Content-Detection-Using-Machine-Learning

    Malicious Web Content Detection using Machine Learning

    NOTE –

    1. If you face any issue, first refer to Troubleshooting.md. If you are still not able to resolve it, please file an issue with the appropriate template (Bug report, question, custom issue or feature request).

    2. Please support the project by starring it 🙂

    Steps for reproducing the project –

    • Install all the required packages using the following command – pip install -r requirements.txt. Make sure your pip is consistent with the Python version you are using by typing pip -V.
    • Move the project folder to the correct localhost location. For eg. /Library/WebServer/Documents in case of Macs.
    • (If you are using a Mac) Give permissions to write to the markup file sudo chmod 777 markup.txt.
    • Modify the path of your Python 2.x installation in clientServer.php.
    • (If you are using anything other than a Mac) Modify the localhost path in features_extraction.py to your localhost path (or host the application on a remote server and make the necessary changes).
    • Go to chrome://extensions, activate developer mode, click on load unpacked and select the ‘Extension’ folder from our project.
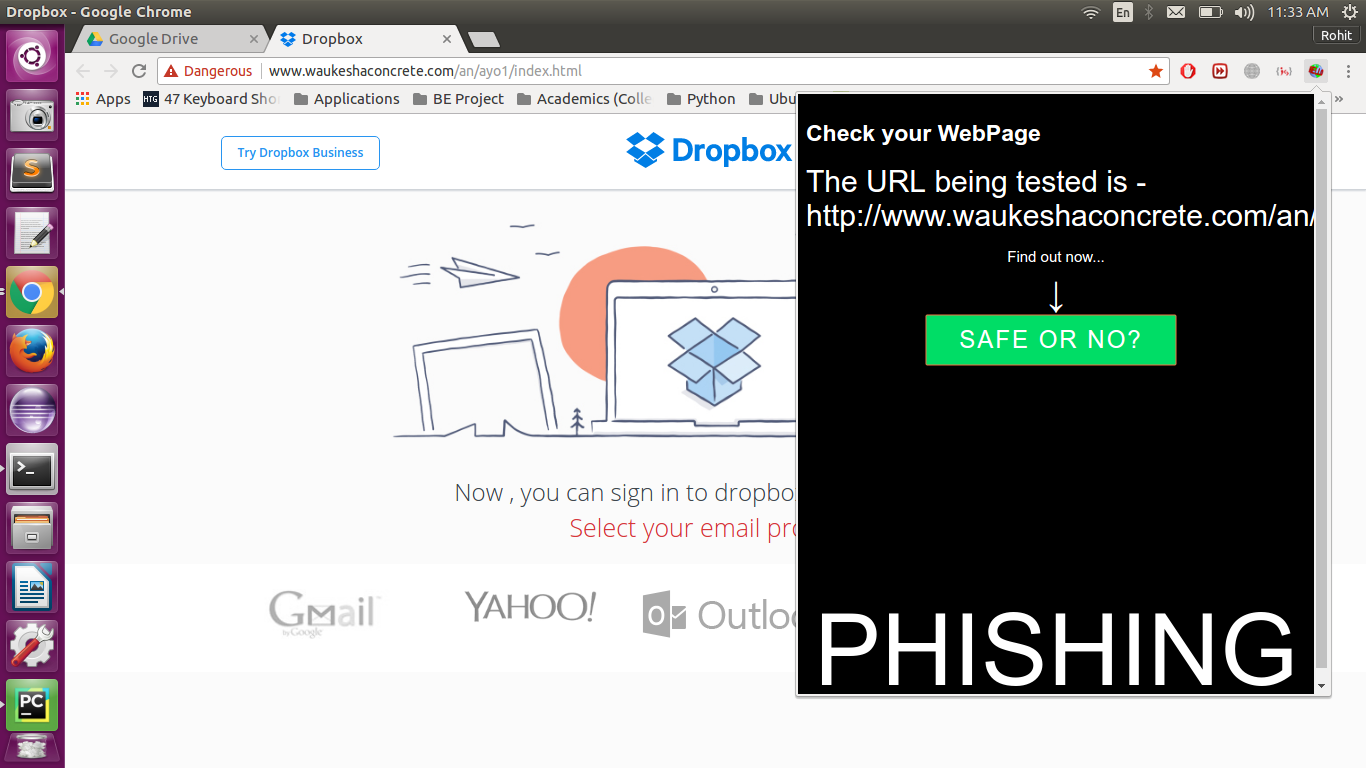
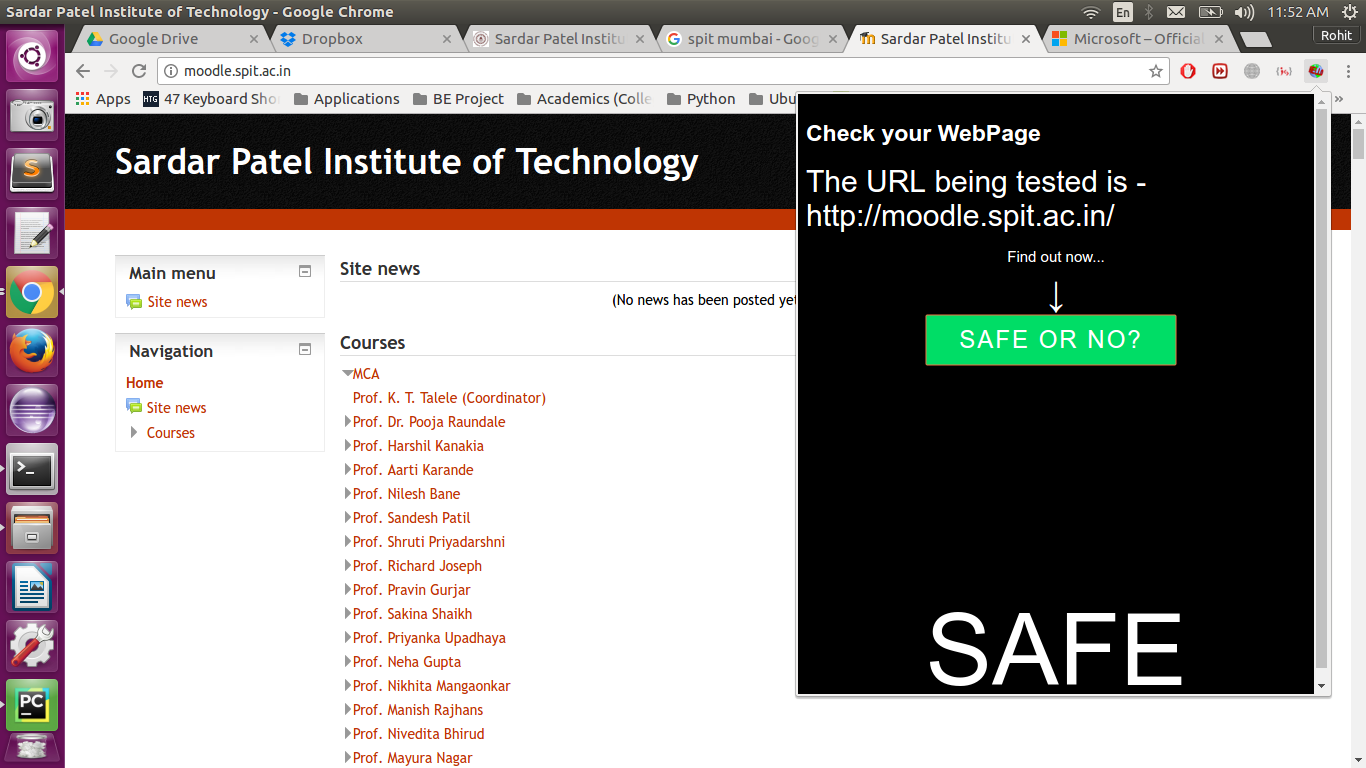
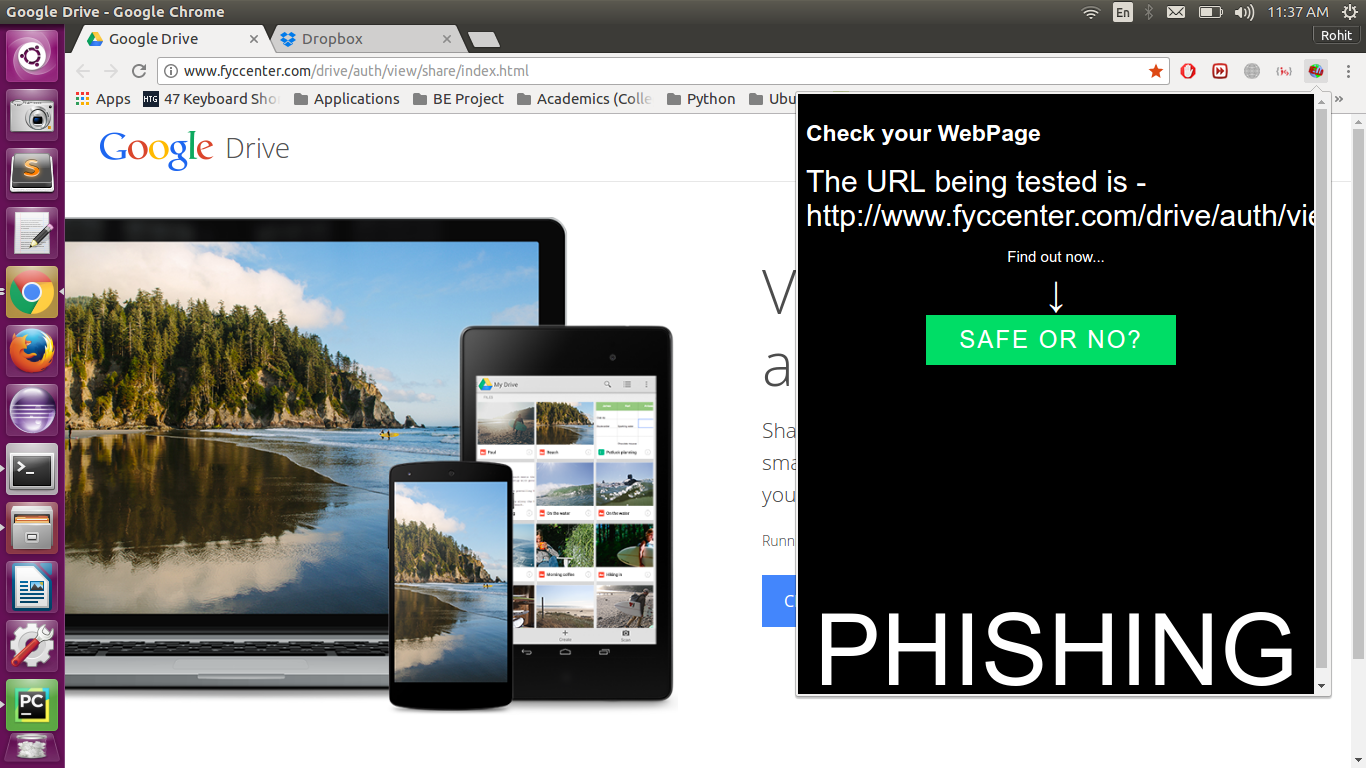
    • Now, you can go to any web page and click on the extension in the top right panel of your Chrome window. Click on the ‘Safe of not?’ button and wait for a second for the result.
    • Done!

    Abstract –

    • Naive users using a browser have no idea about the back-end of the page. The users might be tricked into giving away their credentials or downloading malicious data.
    • Our aim is to create an extension for Chrome which will act as middleware between the users and the malicious websites, and mitigate the risk of users succumbing to such websites.
    • Further, all harmful content cannot be exhaustively collected as even that is bound to continuous development. To counter this we are using machine learning – to train the tool and categorize the new content it sees every time into the particular categories so that corresponding action can be taken.

    Take a look at the demo

    A few snapshots of our system being run on different webpages –

    spit_safe Fig 1. A safe website – www.spit.ac.in (College website)

    drive_phishing Fig 2. A phishing website which looks just like Google Drive.

    dropbox_phishing Fig 3. A phishing website which looks just like Dropbox

    moodle_safe Fig 4. A safe website – www.google.com

    Visit original content creator repository https://github.com/philomathic-guy/Malicious-Web-Content-Detection-Using-Machine-Learning
  • argocd-trivy-extension

    argocd-trivy-extension

    Argo CD UI extension that displays vulnerability report data from Trivy, an open source security scanner.

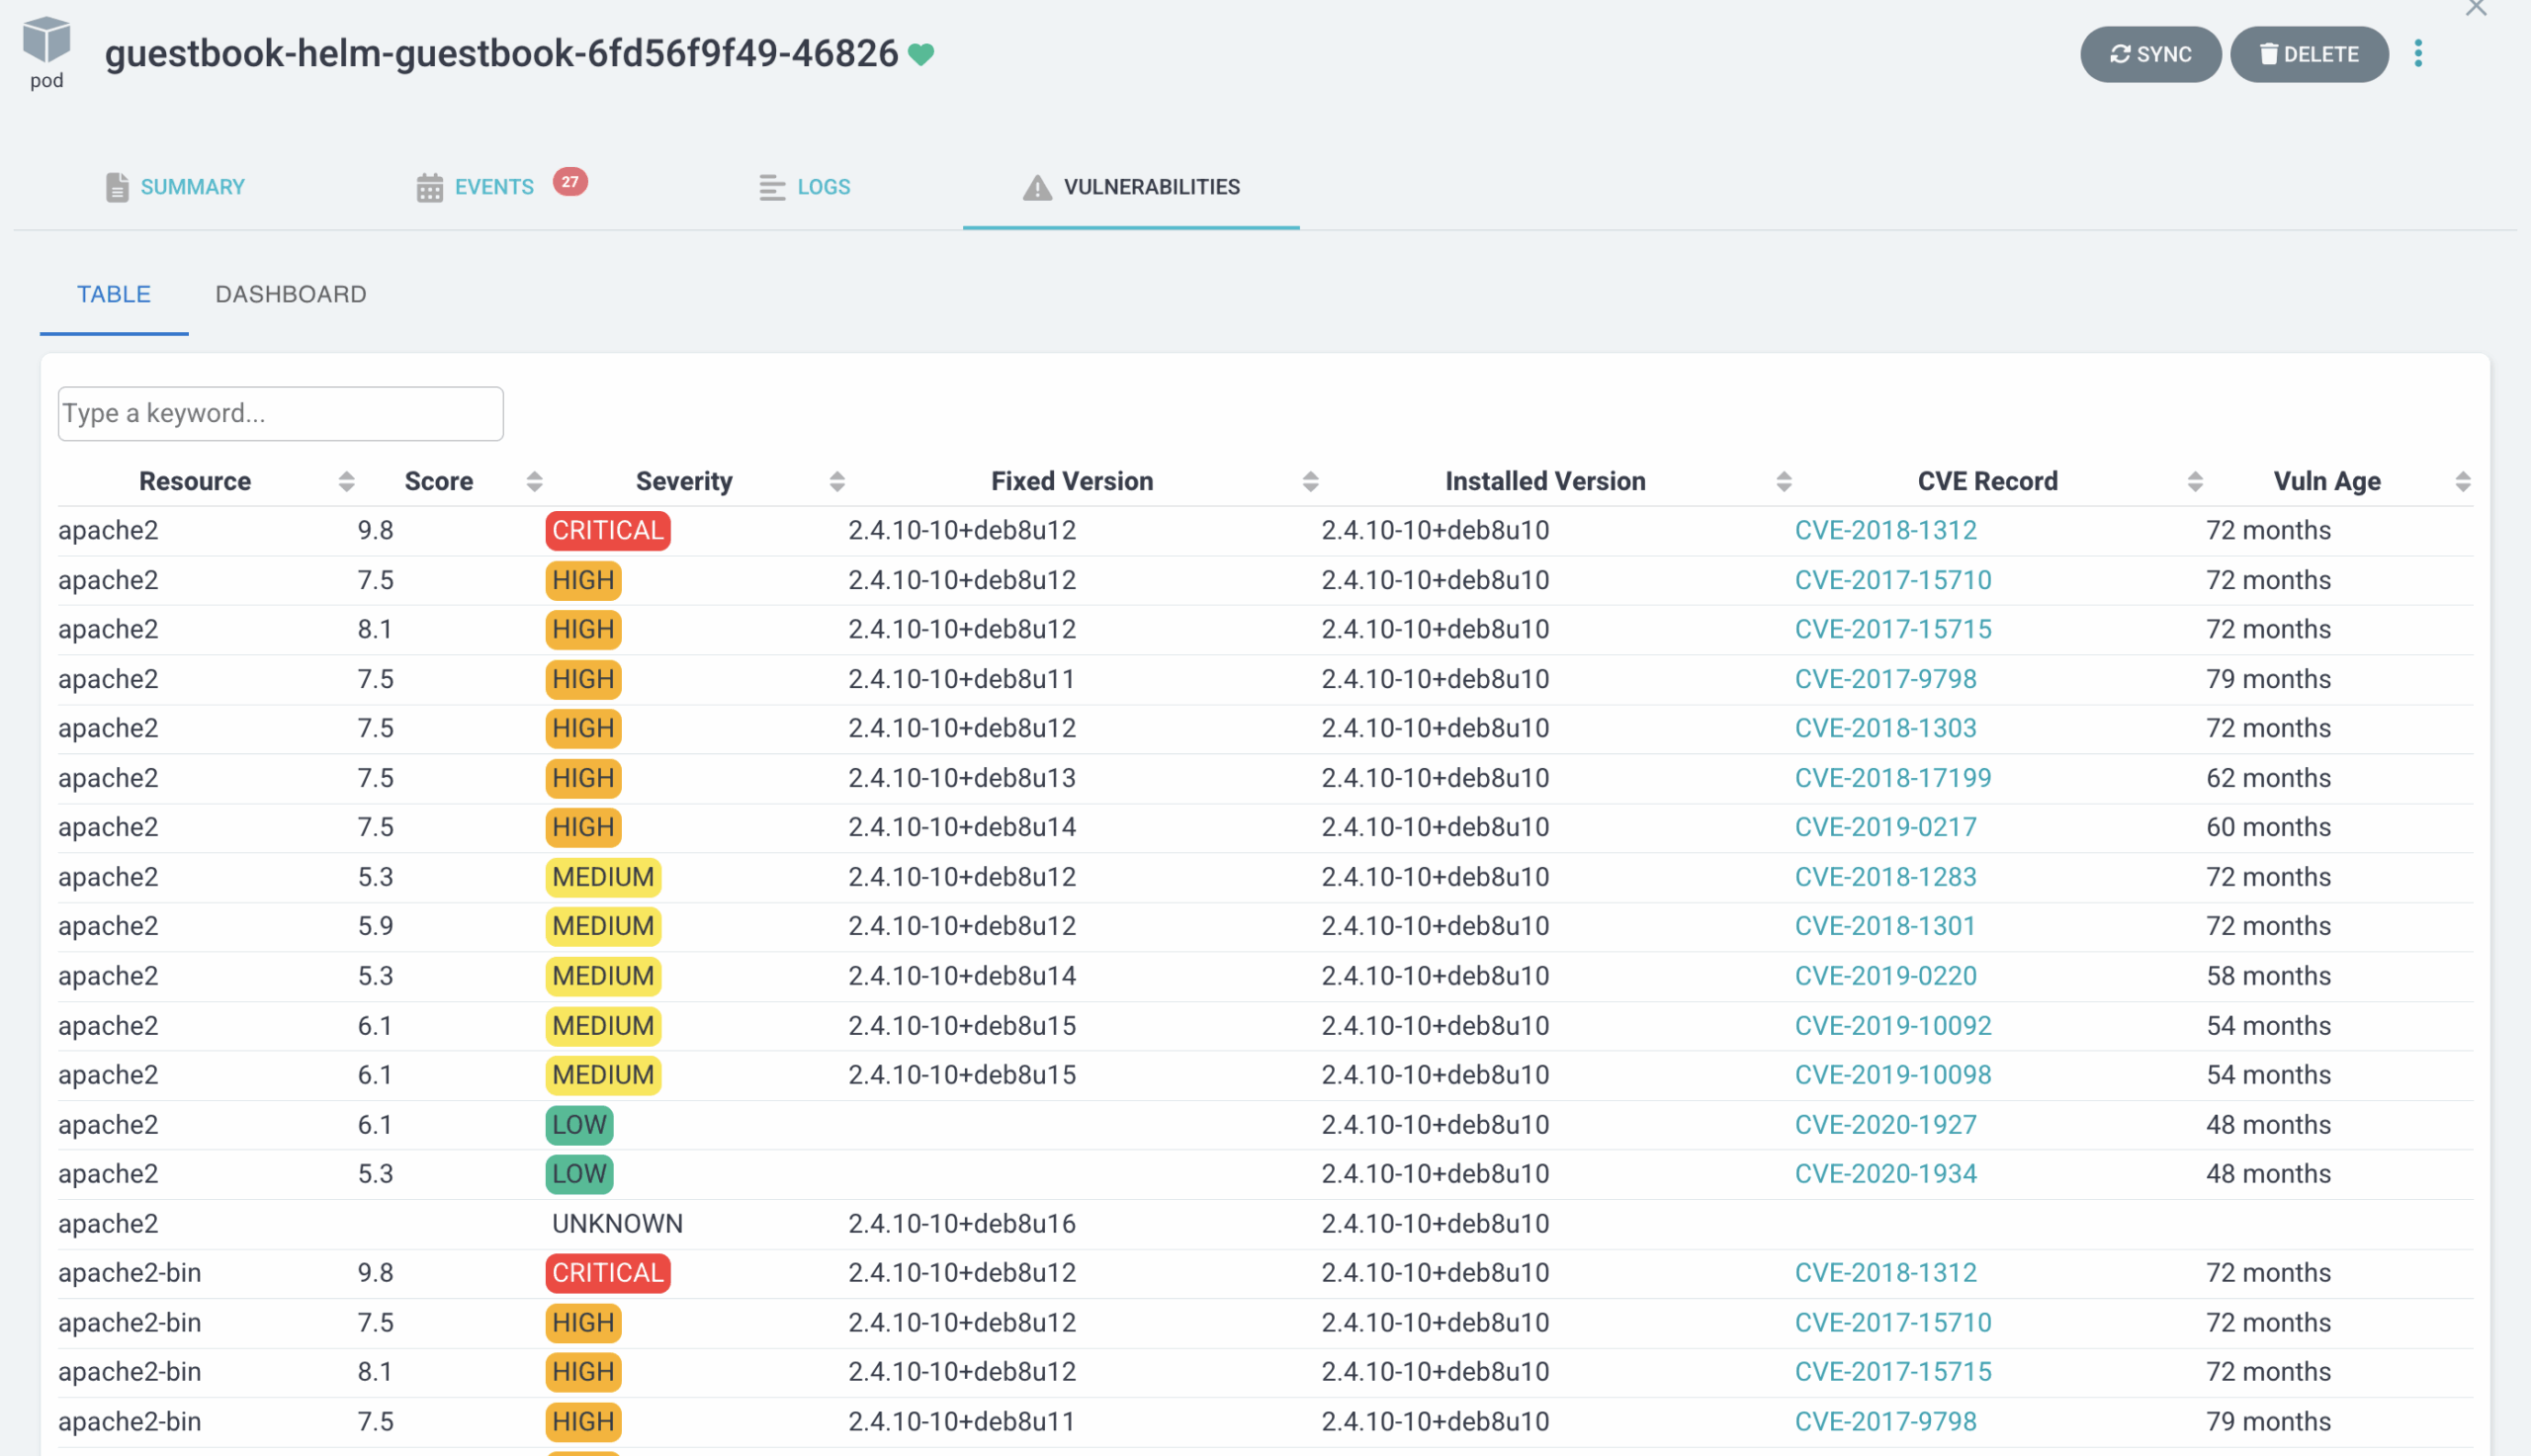
    Trivy creates a vulnerability report Kubernetes resource with the results of a security scan. The UI extension then parses the report data and displays it as a grid and dashboard viewable in Pod resources within the Argo CD UI.

    vulnerabilities dashboard

    Prerequisites

    Install UI extension

    The UI extension needs to be installed by mounting the React component in Argo CD API server. This process can be automated by using the argocd-extension-installer. This installation method will run an init container that will download, extract and place the file in the correct location.

    Helm

    To install the UI extension with the Argo CD Helm chart add the following to the values file:

    server:
      extensions:
        enabled: true
        extensionList:
          - name: extension-trivy
            env:
              - name: EXTENSION_URL
                value: https://github.com/mziyabo/argocd-trivy-extension/releases/download/v0.2.0/extension-trivy.tar
              - name: EXTENSION_CHECKSUM_URL
                value: https://github.com/mziyabo/argocd-trivy-extension/releases/download/v0.2.0/extension-trivy_checksums.txt

    Kustomize

    Alternatively, the yaml file below can be used as an example of how to define a kustomize patch to install this UI extension:

    apiVersion: apps/v1
    kind: Deployment
    metadata:
      name: argocd-server
    spec:
      template:
        spec:
          initContainers:
            - name: extension-trivy
              image: quay.io/argoprojlabs/argocd-extension-installer:v0.0.1
              env:
              - name: EXTENSION_URL
                value: https://github.com/mziyabo/argocd-trivy-extension/releases/download/v0.2.0/extension-trivy.tar
              - name: EXTENSION_CHECKSUM_URL
                value: https://github.com/mziyabo/argocd-trivy-extension/releases/download/v0.2.0/extension-trivy_checksums.txt
              volumeMounts:
                - name: extensions
                  mountPath: /tmp/extensions/
              securityContext:
                runAsUser: 1000
                allowPrivilegeEscalation: false
          containers:
            - name: argocd-server
              volumeMounts:
                - name: extensions
                  mountPath: /tmp/extensions/
          volumes:
            - name: extensions
              emptyDir: {}

    Release Notes

    WIP, contributions welcome

    License

    Apache-2.0

    Visit original content creator repository https://github.com/mziyabo/argocd-trivy-extension
  • pki

    Certificate Authority Management Utilities

    This repo contains helpful and easy to use utilities for managing the public key
    infrastructure (PKI) at your organization, or for yourself. You can do a lot
    here:

    • Generate a Root Certificate Authority
    • Create Intermediate CAs, like a TLS, Code-signing, or Email CA
    • Sign and issue web server certificates for your domains
    • Create personal email and browser PKCS-12 certificates for email and
      web-based authentication

    This project heavily utilizes OpenSSL and requires Bash.


    Table of Contents

    1. Introduction
    2. Creating a Root Certificate Authority
      1. Update Config File
      2. Run Utility
    3. Creating Intermediate Certificate Authorities
      1. Run Utilities
    4. Creating a Web SSL Certificate for a Domain
      1. Run Utility
    5. Creating a Client SSL Certificate
      1. Run Utility
      2. Browser Bundle
    6. Final Notes
      1. Security
      2. Web Server Install
      3. Browser Install
      4. Known Issues

    1. Introduction

    All of the utilities are in the bin directory. These files use the config
    files in the etc directory. There’s no reason to ever edit any thing in these
    two folders.

    When you run the tools, they will create the folders ca, certs, and crl.
    These will contain your generated certificates, private keys, certificate
    signing requests, certificate revocation lists, database, and serial files that
    OpenSSL generates.

    2. Creating a Root Certificate Authority

    The first thing you’ll want to do is create the Root CA. This is the master
    certificate and key that will sign all of the Intermediate CAs. Intermediate
    CAs are the TLS CA for signing both web server and web client certificates, the
    Software CA for signing software packages, and the Email CA for signing S/MIME
    certificates.

    Structuring your PKI hierarchy this way allows the Root key to stay private or
    behind multiple layers of security. The Intermediate keys, if ever exposed,
    could be revoked without putting the entire system in jeopardy. This is a best
    practice that we’ll adhere to in these utilities.

    2.1 Update Config File

    Update the config file in this directory to have the correct names and info.
    These names will be embedded into the certificates.

    2.2 Run Utility

    To generate the Root CA:

    $> ./bin/root-ca.sh
    

    This will guide you through the set-up process. It will create the following
    files and folders:

    • /ca Certificate Authority files
      • /root-ca Root CA files, certificates and signing requests
        • /db Root CA database and serial files
        • /private Key files, this is untracked in git
          • RootCA.key Private key file for Root CA
        • RootCA.crt Certificate file
        • RootCA.csr Signing request file
    • /crl Ceritificate revocation lists
      • RootCA.crl Public revocation list file, this should ultimately go on
        your webserver. The URL will be embedded into certificates.

    3. Creating Intermediate Certificate Authorities

    Now that we have the Root CA, we’ll create all of the Intermediate CAs. The only
    required one to finish this guide is the TLS CA but it’s simple to generate them
    all.

    3.1 Run Utilities

    To generate the TLS CA:

    $> ./bin/tls-ca.sh
    

    This will guide you through the set-up process. It will create the following
    files and folders:

    • /ca
      • /tls-ca TLS CA files, certificates and signing requests
        • /db TLS CA database and serial files
        • /private Key files, this is untracked in git
          • TLSCA.key Private key file for Root CA
        • TLSCA.crt Certificate file
        • TLSCA.csr Signing request file
        • TLSCAChain.pem Chained certificate file containing the Root and TLS CA
          certificates.
    • /crl
      • TLSCA.crl Public revocation list file, this should ultimately go on your
        webserver. The URL will be embedded into certificates.

    Similar files are created for the other two Intermediate CAs. To generate the
    Software CA:

    $> ./bin/software-ca.sh
    

    To generate the Email CA:

    $> ./bin/email-ca.sh
    

    4. Creating a Web SSL Certificate for a Domain

    The TLS CA is used to sign web server certificates, which is the most common
    application and use-case for PKI and probably why you’re here 😛

    Creating a new server certificate is simple, and you can just follow the
    on-screen instructions. Just make sure to read the few instructions included.
    Please remember these three things:

    1. The fully qualified domain name (FQDN) is usually of the form www.domain.com.
    2. When adding FQDNs at the beginning, add both the www and non-www domains. For
      example, both www.example.org and example.org. The script will prompt you to
      add as many as you’d like. You can probably even do a wildcard but I haven’t
      tested that yet.
    3. When adding the Organization Name during the CSR questions, make sure it’s
      the same “Company Name” you have in your config file. Otherwise, the
      process will halt and you will have to start over! This is an OpenSSL quirk.

    4.1 Run Utility

    To generate a new web server certificate:

    $> ./bin/server.sh
    

    This will create the following files and folders:

    • /certs Server and client files
      • /tls-ca TLS CA signed files
        • /private Key files, this is untracked in git
          • example.org.key Private key file for your web domain. Your web
            server will need this file.
        • example.org.crt Web domain certificate file
        • example.org.csr Signing request file
        • example.org.bundle.pem Certificate bundle containing the server’s
          signed and issued certificate, the Intermediate TLS CA’s certificate,
          and the Root CA’s certificate. Your web server will need this file.

    5. Creating a Client SSL Certificate

    An often unused, but very powerful security mechanism is PKCS-12 client
    certificate authentication. These are certificates issued to people or devices
    that are signed by the Intermediate CA and grant that person or device access to
    the web server. In nginx, this is done by using ssl_client_certificate and
    pointing that config optionto the TLSCAChain.pem file copied to your web
    server.

    This utility will generate a password protected .p12 file that the user can
    import into their web browser. You can then set up your web server to optionally
    require a client certificate for access. This client certificate replaces the
    need for the user to keep a password and provides greater security to any
    application.

    5.1 Run Utility

    To generate a client certificate:

    $> ./bin/client.sh
    

    Here are some helpful notes:

    1. This will prompt you to create a password for the client’s private key. Make
      sure you enter one at least 4 characters long or the script will halt.
    2. During the CSR process, it will ask your for the “Organization Name”. Make
      sure this is the same as the “Company Name” in the config file.
    3. During the CSR process, enter the user’s name into the “Common Name” field,
      and enter their email address into the “Email Address” field.
    4. You will need the TLS CA private key password to sign this client
      certificate.

    The following files are generated:

    • /certs
      • /tls-ca
        • /private
          • stallman_richard.key Private key file for the client.
          • stallman_richard.p12 P12 browser bundle file. This needs to be
            imported into the browser along with the trusted Root CA
            certificate file.
        • stallman_richard.crt Client certificate file
        • stallman_richard.csr Signing request file

    5.2 Browser Bundle

    At the end of the script, you are asked if you want to generate a “client
    certificate bundle”. This is the .p12 file from earlier. If you do this, you
    will be prompted for a name to embed into the file. This name will display to
    the user when they are asked by their browser to select a certificate.

    You do not need to enter an export password but it is strongly recommended that
    you do. The .p12 files should be treated like private keys since they contain
    both the public and private key parts.

    6. Final Notes

    6.1 Security

    Always make sure .key and .p12 files remain untracked. This is automatically
    done for you through .gitignore files but it’s important that you know this.
    These files should also be chmod 400 to protect them on the web server.

    6.2 Web Server Install

    Your web server will want the example.org.key and example.org.bundle.pem
    files for it to load the SSL correctly. If you’re using client certificates,
    also copy over the TLSCAChain.pem file.

    6.3 Browser Install

    Once you create a server certificate, your browser will not immediately trust
    it. To do this automatically for all server certificates that you create, add
    your Root CA certificate file to your browser’s list of trusted authorities.
    This is the file RootCA.crt (or similarly named) in the ca folder.

    If you’re on MacOS, double click this file and make sure you open it again in
    KeyChain, expand the Trust tab, and ensure that everything is always trusted.

    For Chrome, go to Settings -> Show Advanced Settings -> Manage Certificates.
    This will prompt KeyChain in MacOS or show you a window with an Authorites tab.
    If you see the Chrome Certificates window, then go to the Authorities tab and
    click “Import” and select the Root CA certificate file. Make sure you trust this
    authority.

    For Firefox, go to Preferences -> Advanced -> Certificates and click “View
    Certificates”. Click the Authorities tab and then click “Import” and select the
    Root CA certificate file. Make sure you trust this authority.

    You may need to restart your browser for this to take effect, since SSL is often
    cached.

    6.4 Known Issues

    Here is a list of the current limitations and planned updates:

    1. There’s no way to revoke certificates really. This is needed to be added as
      as a command in some of the scripts.
    2. CRLs would then need to be inspected to see if they’re working with the
      revokations. CRLs are also difficult to get onto a public web server. This
      problem, if solved, should be documented here.

    At this point, it’s still somewhat unclear to me what the databases and serial
    files are that get generated. I think I need to spend more time with revokations
    to understand that.

    Visit original content creator repository
    https://github.com/mikegioia/pki

  • CucumberAutomationReports

    Cucumber-Java-JUnit Archetype

    This is the simplest possible build script setup for Cucumber using Java.
    There is nothing fancy like a webapp or browser testing. All this does is to show you how
    to install and run Cucumber!

    Usage

    Open a command window and run:

    mvn test
    

    This runs Cucumber features using Cucumber’s JUnit runner. The @RunWith(Cucumber.class) annotation on the RunCukesTest
    class tells JUnit to kick off Cucumber.

    Overriding options

    The Cucumber runtime parses command line options to know what features to run, where the glue code lives, what plugins to use etc.
    When you use the JUnit runner, these options are generated from the @CucumberOptions annotation on your test.

    Sometimes it can be useful to override these options without changing or recompiling the JUnit class. This can be done with the
    cucumber.options system property. The general form is:

    mvn -Dcucumber.options="..." test
    

    Let’s look at some things you can do with cucumber.options. Try this:

    -Dcucumber.options="--help"
    

    That should list all the available options.

    IMPORTANT

    When you override options with -Dcucumber.options, you will completely override whatever options are hard-coded in
    your @CucumberOptions or in the script calling cucumber.api.cli.Main. There is one exception to this rule, and that
    is the --plugin option. This will not override, but add a plugin. The reason for this is to make it easier
    for 3rd party tools (such as Cucumber Pro) to automatically configure additional plugins by appending arguments to a cucumber.properties
    file.

    Run a subset of Features or Scenarios

    Specify a particular scenario by line (and use the pretty plugin, which prints the scenario back)

    -Dcucumber.options="classpath:skeleton/belly.feature:4 --plugin pretty"
    

    This works because Maven puts ./src/test/resources on your classpath.
    You can also specify files to run by filesystem path:

    -Dcucumber.options="src/test/resources/skeleton/belly.feature:4 --plugin pretty"
    

    You can also specify what to run by tag:

    -Dcucumber.options="--tags @bar --plugin pretty"
    

    Running only the scenarios that failed in the previous run

    -Dcucumber.options="@target/rerun.txt"
    

    This works as long as you have the rerun formatter enabled.

    Specify a different formatter:

    For example a JUnit formatter:

    -Dcucumber.options="--plugin junit:target/cucumber-junit-report.xml"
    

    Visit original content creator repository
    https://github.com/sibisiphumuza/CucumberAutomationReports

  • NSString-BBRSACryptor

    NSString-BBRSACryptor

    介绍

    使用OpenSSL进行公钥和私钥的解密和解密,并且对私钥签名,公钥验证

    1.加密:客户端使用公钥加密数据,服务器端使用私钥解密数据(主要实现数据加密)。
    2.加签:客户端用私钥加签,服务器端用公钥验签(主要为了防止别人模拟我们的客户端来攻击我们的服务器,导致瘫痪)。

    1. 公钥私钥生成,保存

    • 客户端生成一对公钥私钥,假如叫公钥K、私钥K,服务器生成一对公钥私钥,假如叫公钥F、私钥F.
    • 客服端把公钥K发给服务器,服务器保存公钥K,服务器把公钥F 发给客服端,客服端保存公钥F.(公钥都发给对方,自己保留私钥)

    2. 加密交互流程

    • 客服端用公钥F加密数据,服务器接收后,用私钥F解密.
    • 服务器用公钥K加密数据,客服端接收后,用私钥k解密.

    3.签名交互流程

    • 客服端用私钥K签名,服务器用公钥K验证签名

    代码使用

    添加到你的工程

    pod 'NSString+BBRSACryptor'
    

    导入头文件

    #import "NSString+BBRSACryptor.h"

    使用

    /// 生成公钥和私钥
    + (void)generatePublicAndPrivateKey ;
    
    /// 公钥加密
    + (NSString *)encryptString:(NSString *)string publicKey:(NSString *)publicKey;
    
    /// 公钥解密
    + (NSString *)decodeString:(NSString *)string publicKey:(NSString *)publicKey ;
    
    /// 私钥签名
    + (NSString *)singString:(NSString *)string privateKey:(NSString *)privateKey;
    
    /// 私钥签名MD5
    + (NSString *)singMD5String:(NSString *)string privateKey:(NSString *)privateKey;
    
    /// RSA验证签名
    + (BOOL)verifyString:(NSString *)string sign:(NSString *)signString publicKey:(NSString *)publicKey;
    
    /// RSA MD5 验证签名
    + (BOOL)verifyMD5String:(NSString *)string sign:(NSString *)signString publicKey:(NSString *)publicKey;

    NSString-BBRSACryptor

    NSString-BBRSACryptor is available under the MIT license. See the LICENSE file for more info.

    Visit original content creator repository
    https://github.com/silence0201/NSString-BBRSACryptor

  • ntsb_app_for_splunk

    NTSB App for Splunk

    A Splunk app to process NTSB Safety Data. This app now supports the Splunk Cloud platform.

    Install app on Splunk Enterprise (standalone)

    1. Click the Settings gear icon next to Apps on the Launcher homepage.
    2. Click Install app from file.
    3. Navigate to ntsb_app_for_splunk.tar.gz.
    4. Click Upload.
    5. Restart Splunk.

    Add the NTSB Data

    1. Click Add Data on the Launcher homepage.
    2. Click Upload files from my computer.
    3. Click Select File.
    4. Navigate to the location of the AviationData.csv data file. This file will be in $REPO_HOME\jupyter_for_all_ntsb\output\ directory if you used the data download and cleanse workflow.
    5. Click Next.
    6. For Source type, click Custom, then select ntsb_csv.
    7. Click Next.
    8. For Index, click Create a new index, set Index Name to ntsb_csv, set Max Size of Entire Index to 50MB, set App to NTSB App for Splunk.
    9. Click Save.
    10. Click Review.
    11. Click Submit.

    Access the main Dashboard

    1. Select Apps | NTSB App for Splunk.

    Data Download and Cleanse Workflow

    To use this app, the raw data file from NTSB needs to be downloaded and reformatted. There are two Jupyter Notebooks to assist with the data cleanup. The app assumes the cleanup Jupyter Notebook has been run against the base CSV download.

    1. data_set_download.ipynb – used to download the raw data file from NTSB.
    2. data_set_cleanup.ipynb – used to process the raw data file, specifically reconfiguring the date format and parsing the Location field into separate City and State fields.
      The notebook is available from Github

    Credit for External Lookup Data

    The airport details data has been downloaded from OurAirports.com. More information on the project and the Public Domain license can be found here.

    Build details

    1. Clone github repo git clone https://github.com/csyvenky/ntsb_app_for_splunk.
    2. Make your enhancements and increase the Build and Version numbers in the ./default/app.conf file.
    3. Make a tarball of the app folder tar --exclude='ntsb_app_for_splunk/.vscode' --exclude='ntsb_app_for_splunk/.git*' --exclude='.DS_Store*' -czvf ntsb_app_for_splunk.tar.gz ntsb_app_for_splunk/.
    4. Run AppInspect validation via Postman https://dev.splunk.com/enterprise/docs/developapps/testvalidate/appinspect/splunkappinspectapi/runrequestspostman.
    5. Test the app installation on clean instance of Splunk.

    Visit original content creator repository
    https://github.com/csyvenky/ntsb_app_for_splunk

  • AdventOfCode

    last_commit commit_activity stars code_size


    Advent Of Code

    Solutions in C#


    Table of Contents
    1. About the project
    2. Built with
    3. Getting started
    4. Contact


    About The Project

    This is console application with my solutions of Advent of Code quizes. In this moment I didn’t solve every problem but there will be all solutions in the future.
    I made this project with the aim of problem solving and LINQ practice. That’s why most of solutions are made in LINQ (if there is a possibility to keep solution clean and readable at decent level)


    Built With


    Getting Started

    1. Install .NET
    2. Clone the repo (or download in zip)
      git clone https://github.com/adrianMoskal/AdventOfCode.git

    3. Navigate to AdventOfCode folder with source code and change puzzleInput.txt files content to your puzzle input.
    4. Launch
      • Command line
        Use this command to run explicit solution:
        dotnet run <year> <day>
        e.g.:
        dotnet run 2015 3

      • Visual Studio
        Right click on project and go to Debug section in project properties. Setup command line arguments:
        <year> <number>
        e.g.:
        2015 3
        Run project


    Contact

    adrian-moskal-990a5a191 17234168
    Visit original content creator repository https://github.com/adrianMoskal/AdventOfCode