Since I never used Material Design before, I thought this project would make a good candidate. For this I used Daemonite’s Material UI, which uses Bootstrap with some customizations added to it. Instructions on how to use Daemonite’s Material UI in a Rails project can be found here.
Font Awesome
Font Awesome has a gem available for including FA in a Rails project. Instead this project used yarn for installing the FA package, since relies on the asset pipeline.
I did copy the view helper from this gem and renamed it from icon to fa_icon
SendGrid
The production version of this application uses SendGrid for sending mails.
S3
In some environments images are uploaded to an S3 bucket using CarrierWave. If you want to use this feature, make sure you have an S3 bucket created and add the required keys to the corresponding ENV variables:
WeatherMate est une application Android de prévisions météorologiques développée par Elliot Casna, Marc Bériot et Anne Passelègue dans le cadre de leur projet de fin de semestre pour le BUT2 informatique à l’IUT Lyon 1.
L’objectif de l’application est de fournir des informations précises et à jour sur les conditions météorologiques actuelles et futures pour les utilisateurs.
🚀 Fonctionnalités
Prévisions météorologiques en temps réel
Recherche de prévisions météorologiques pour les villes du monde entier
Affichage des températures maximales et minimales, de l’humidité, de la vitesse du vent et des conditions météorologiques actuelles
Interface utilisateur conviviale et facile à naviguer
Possibilité de choisir un emplacement géographique afin de connaitre les conditions météorologiques
📦 Librairies utilisées
WeatherMate utilise deux librairies open source pour fournir une expérience utilisateur optimale :
Lottiefiles : Une bibliothèque d’animations vectorielles pour Android, iOS et le web. Nous avons utilisé Lottiefiles pour ajouter des animations fluides à notre interface utilisateur et améliorer l’expérience utilisateur globale.
Retrofit : Une bibliothèque pour Android qui permet de faciliter l’accès aux API REST. Nous avons utilisé Retrofit pour interroger l’API de prévisions météorologiques et récupérer les données pour les afficher dans notre application.
📝 Comment contribuer
Nous apprécions toutes les contributions à WeatherMate, qu’il s’agisse de rapports de bugs, d’améliorations de fonctionnalités ou de pull requests. Si vous souhaitez contribuer, veuillez consulter notre guide de contribution dans le fichier CONTRIBUTING.md.
📄 Licence
WeatherMate est sous licence MIT. Veuillez consulter le fichier LICENSE pour plus d’informations.
📞 Contact
Si vous avez des questions, des commentaires ou des préoccupations concernant WeatherMate, n’hésitez pas à nous contacter à l’adresse e-mail suivante : weathermate.support@domain.com.
Imitación de subtitulos al igual que la plataforma de aprendizaje “Udemy”.
Es solamente un demo de la simulación del mismo método de seguimiento de subtitulos, no tiene la sincronización de milisegundos, solo por segundos.
Hay que realizarle muchas correcciones, pero solamente es un demo para motivos de aprendizaje, está a una gran distancia de la versión original.
¿Cómo puede servir para motivos de aprendizaje?
Te puede servir para cargar videos de YouTube, descargar los subtitulos y practicar el ‘listening’, a medida que vas viendo el video se remarca el texto que se está reproduciendo, y cuando tengas dudas del qué pronunciaron puedas revisar los subtitulos, teniendo de ventaja que ya sabrás en qué lugar del texto observar.
Espero te ayude en tu aprendizaje, ya que ése fué el motivo para realizarlo, facilitarme el aprendizaje y que otras personas también puedan usarlo. Compartelo si lo consideras adecuado y muchos más puedan beneficiarse.
Si tiene fallas me disculpo de ante mano por la mala experiencia, algún día le agregaré mejoras.
In folder FiraMonoMz-ttf-g (recommended): font files with &, @ and g modified.
In folder FiraMonoMz-ttf: font files with & and @ modified
License & Difference from Fira Mono
This work is based on: Mozilla Fira
Currently based on commit 5c8d9b.
This work is not based on FiraCode.
So Fira Mono Mz doesn’t support font ligatures (I personally don’t find it useful).
Just like Fira Mono, this work is also free and open source,
and the license is the same as Fira Mono.
It changes following chars in Fira Mono:
&: use the design of & in open source font “Hack”
@: use the design of @ in open source font “Inconsolata”
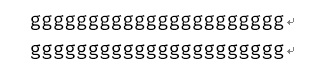
g: slightly modify the shape, to seal the bottom part.
This make the g char looks more readable and balanced in small
font size.
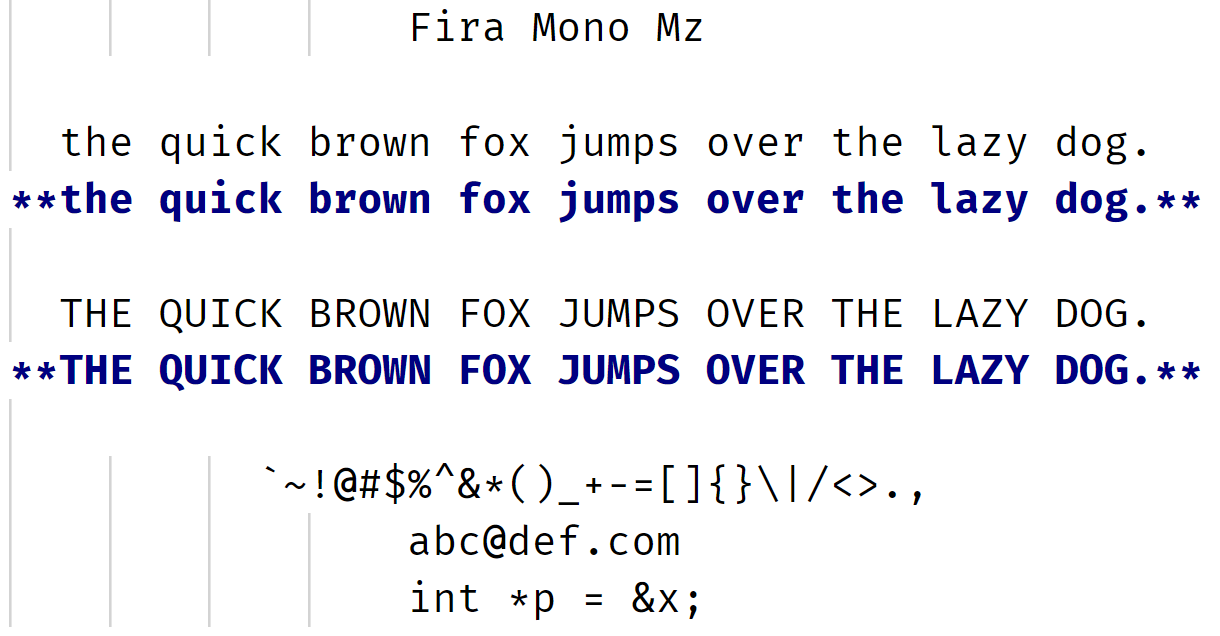
Fira Mono Mz:
Original Fira Mono:
char g comparison in small font size:
char g comparison in large font size:
For font hackers
We have 3 font-forge prject files:
FiraMonoMz-Bold.sfdir\: font-forge project file for font FiraMonoMz-Bold.
FiraMonoMz-Medium.sfdir\: font-forge project file for font FiraMonoMz-Medium.
FiraMonoMz-Regular.sfdir\: font-forge project file for font FiraMonoMz-Regular.
Post-processing to make font be recognized as “Monospaced font”
If you make some changes to the font-forge prject,
remember that after exporting your version of .ttf file using font-forge,
you need to run following commands:
What is done: the script set the isFixedPitch of each font to 1.
(You might need to install fonttools python package first. See fixmono.py for detail.)
See file 0 width glyph.log (which is the output of
grep "^Width:" *.glyph > "../0 width glyph.log") for detail:
search for keyword ‘Width: 0’, you can see 27 chars have 0 width.
As a result, the font generated by font-forge will not set the isFixedPitch to 1,
which makes some software couldn’t recognize the font as Monospaced font.
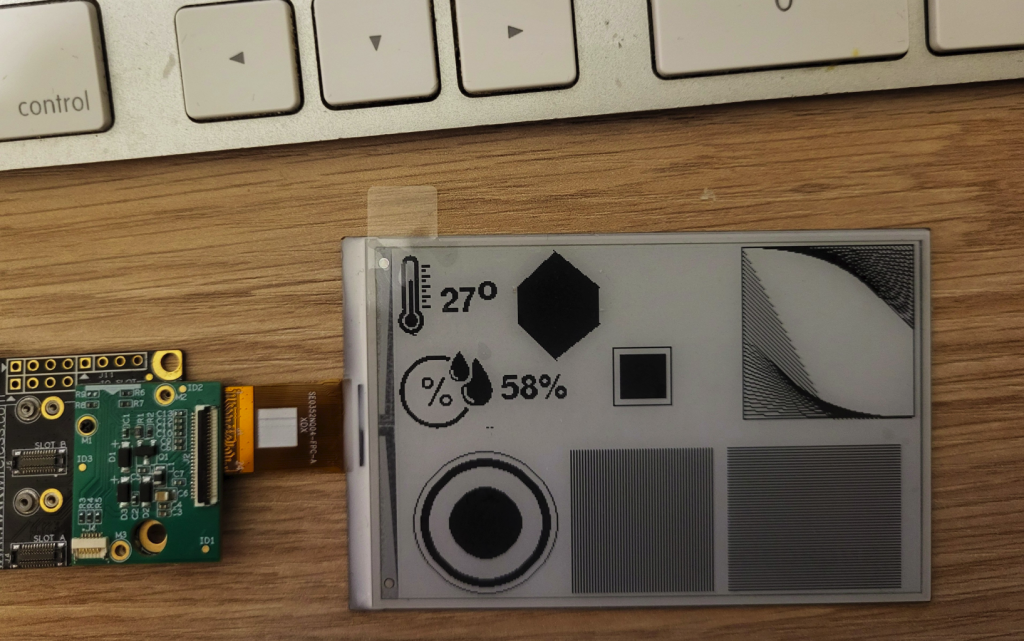
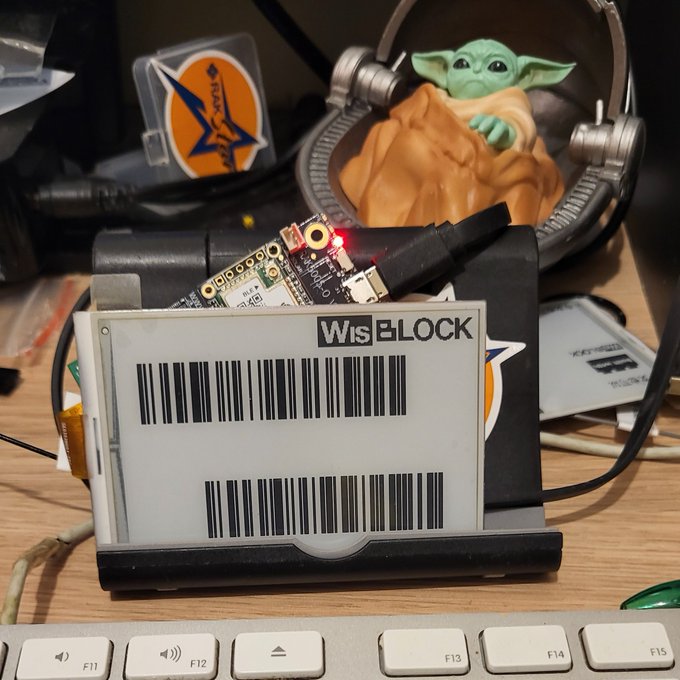
A library for the SE0352NQ01 e-paper display, driven by a Wisblock RAK4631 (nRF52840 + SX1262). It uses Adafruit GFX fonts for Latin characters, and a vaguely compatible format for Chinese, a subset of 2,500 characters anyway, based on micropython-font-to-py. After running
I cleaned up cjk16b.py a little, and added code that produces the CJK16pt.h header file. This file can then be included into the Arduino project. The cjk subset file is included, so you can edit it and add/remove chars.
#include<SE0352NQ01.h>// Include fonts from https://github.com/adafruit/Adafruit-GFX-Library/tree/master/Fonts#include"FreeSansBold12pt7b.h"#include"FreeSerifBoldItalic24pt7b.h"#include"CJK14pt.h"#include"CJK16ptB.h"
API
voidsleep(void);
voidrefresh(void);
voidsend(unsigned char*);
voidsend_DU(unsigned char*);
voidfill(unsigned char);
voiddrawString(char*, uint16_t, uint16_t, GFXfont, uint8_t, unsigned char*);
voiddrawUnicode(
uint16_t*, uint8_t, uint16_t, uint16_t, unsigned char*,
unsigned char*, uint16_t, uint8_t, uint8_t, unsigned char*
);
voiddrawBitmap(
uint8_t, uint8_t, uint16_t,
uint16_t, int8_t, int8_t, // these three only for fonts, not necessary for bitmap imagesuint16_t, unsigned char*, unsigned char*, uint8_t
); // fonts versionvoiddrawBitmap(
uint8_t, uint8_t, uint16_t,
uint16_t, unsigned char*, unsigned char*, uint8_t
); // bitmap images versionuint16_twidth(uint8_t); // returns width given the orientationuint16_theight(uint8_t); // returns height given the orientation
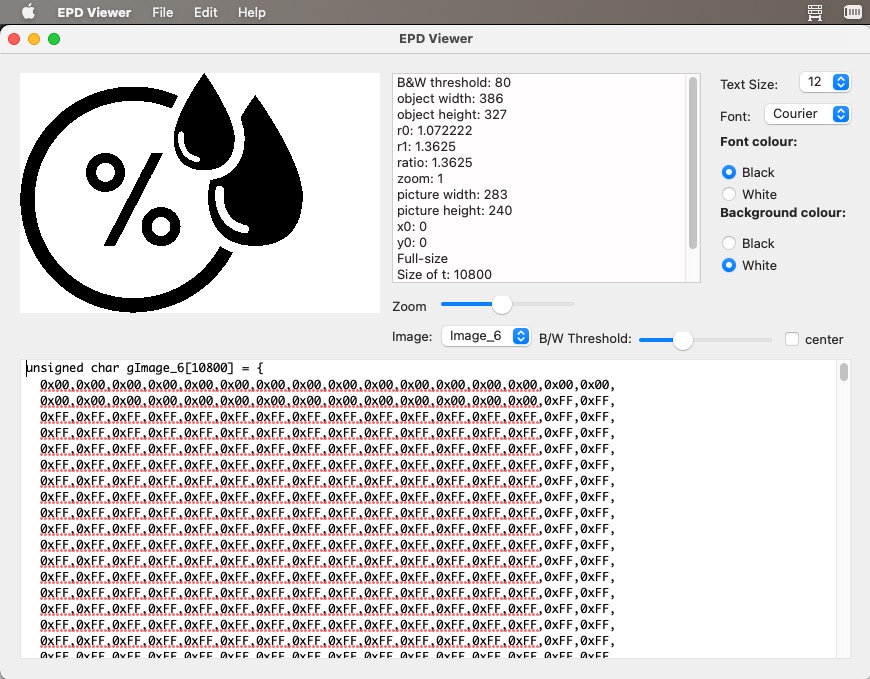
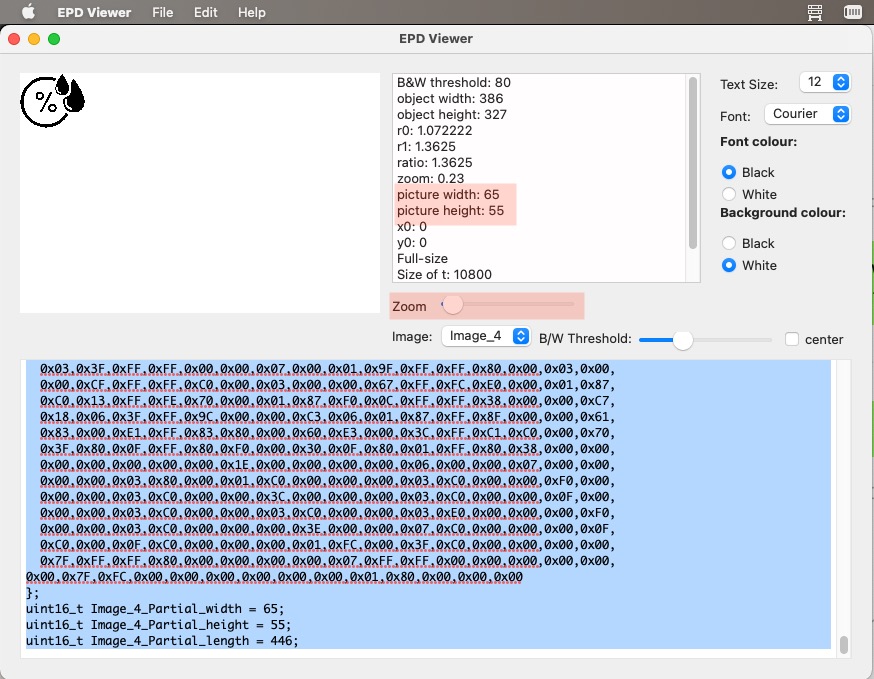
The most important commands are drawString, drawUnicode, and drawBitmap. The first is for ASCII text, the second for Chinese (or other UTF16 codepoints for which you have produced a font), and the third one is for partial images: it is the same code for both images and individual characters, which are both horizontally-encoded bitmaps. I wrote separately a desktop application that creates full-size images, in the RAM buffer format the EPD expects, from pictures you pass it, and partial images encoded as horizontally-encoded bitmaps. These images are resizable with the Zoom slider, and the black-and-white threshold adjustable with the B/W Threshold slider.
The drawString function returns the string’s width in pixels, which you can ignore. That is, you can do:
SE0352.drawString((char*)"This is a test", 0, 34, FreeSansBold18pt7b, 0, frame);
or
uint16_twd=SE0352.drawString((char*)"This is a test", 0, 34, FreeSansBold18pt7b, 0, frame);
Note that if the string overflows the bottom of the screen (239 or 359 depending on orientation), drawString returns without completing, which means that the returned width will be incorrect. If you’re only interested in the string’s width, without drawing it, call strWidth().
uint16_twd=SE0352.strWidth((char*)"This is a test", FreeSansBold18pt7b);
This does basically the same, without drawing anything. It will be accurate too, since the function won’t bail because of screen overflow.
The send and send_GU commands send full-size images to the EPD, using either lut_GC() (full refresh) or lut_DU() (faster refresh that may leave shadows if used too often).
This application, EPD Viewer, was made with Xojo, which is a paid development platform. I will release the code, but it’d require Xojo to compile it. I’ve added in the mean time a binary for Mac OS X, which is what I use. When I can test Linux and Windows version, I will release them too.
Rotation
There are 4 levels of rotation: 0 & 2 (Landscape), and 1 & 3 (Portrait). Rotation is passed to drawString, drawUnicode, and drawBitmap functions every time, so you can draw text in different rotations within the same screen. send and send_GU don’t have yet rotation enabled.
Drawing
I have added a few drawing primitives:
void setPixel(uint16_t x, uint16_t y, uint8_t rotation, uint8_t *buffer);
void clearPixel(uint16_t x, uint16_t y, uint8_t rotation, uint8_t *buffer);
fillContour() works pretty well, but in some cases it may require more than one call. For example, in the image below, fillContour() had to be called twice for the narrow disk: I drew two circles a few pixels apart, then called fillContour() once on the left, and once on the right.
Generating sufficient labeled data is a significant hurdle in the efficient execution of deep learning projects, especially in uncharted territories of image segmentation where labeling demands extensive time, unlike classification tasks. Our study confronts this challenge, operating in an environment constrained by limited hardware resources and the lack of extensive datasets or pre-trained models. We introduce the novel use of Inconsistency Masks (IM) to effectively filter uncertainty in image-pseudo-label pairs, substantially elevating segmentation quality beyond traditional semi-supervised learning techniques. By integrating IM with other methods, we demonstrate remarkable binary segmentation performance on the ISIC 2018 dataset, starting with just 10% labeled data. Notably, three of our hybrid models outperform those trained on the fully labeled dataset. Our approach consistently achieves exceptional results across three additional datasets and shows further improvement when combined with other techniques. For comprehensive and robust evaluation, this paper includes an extensive analysis of prevalent semi-supervised learning strategies, all trained under identical starting conditions.
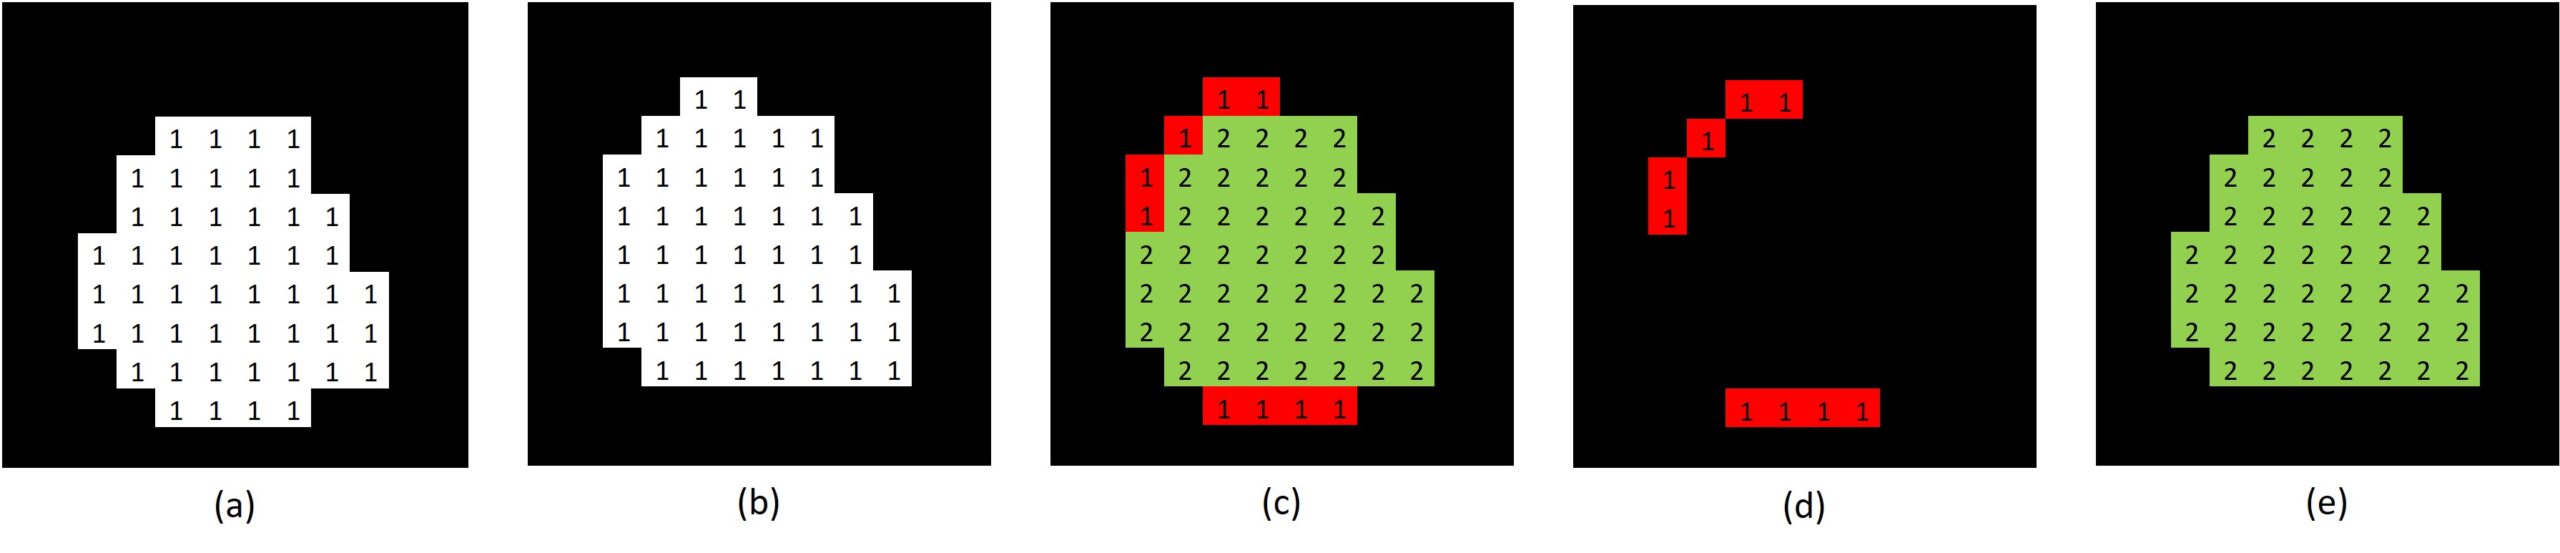
Creation of an Inconsistency Masks
Creation of an Inconsistency Masks with two models: (a) & (b) binary prediction of model 1 and 2 after threshold, (c) sum of the two prediction masks (d) Inconsistency Mask (e) final prediction mask
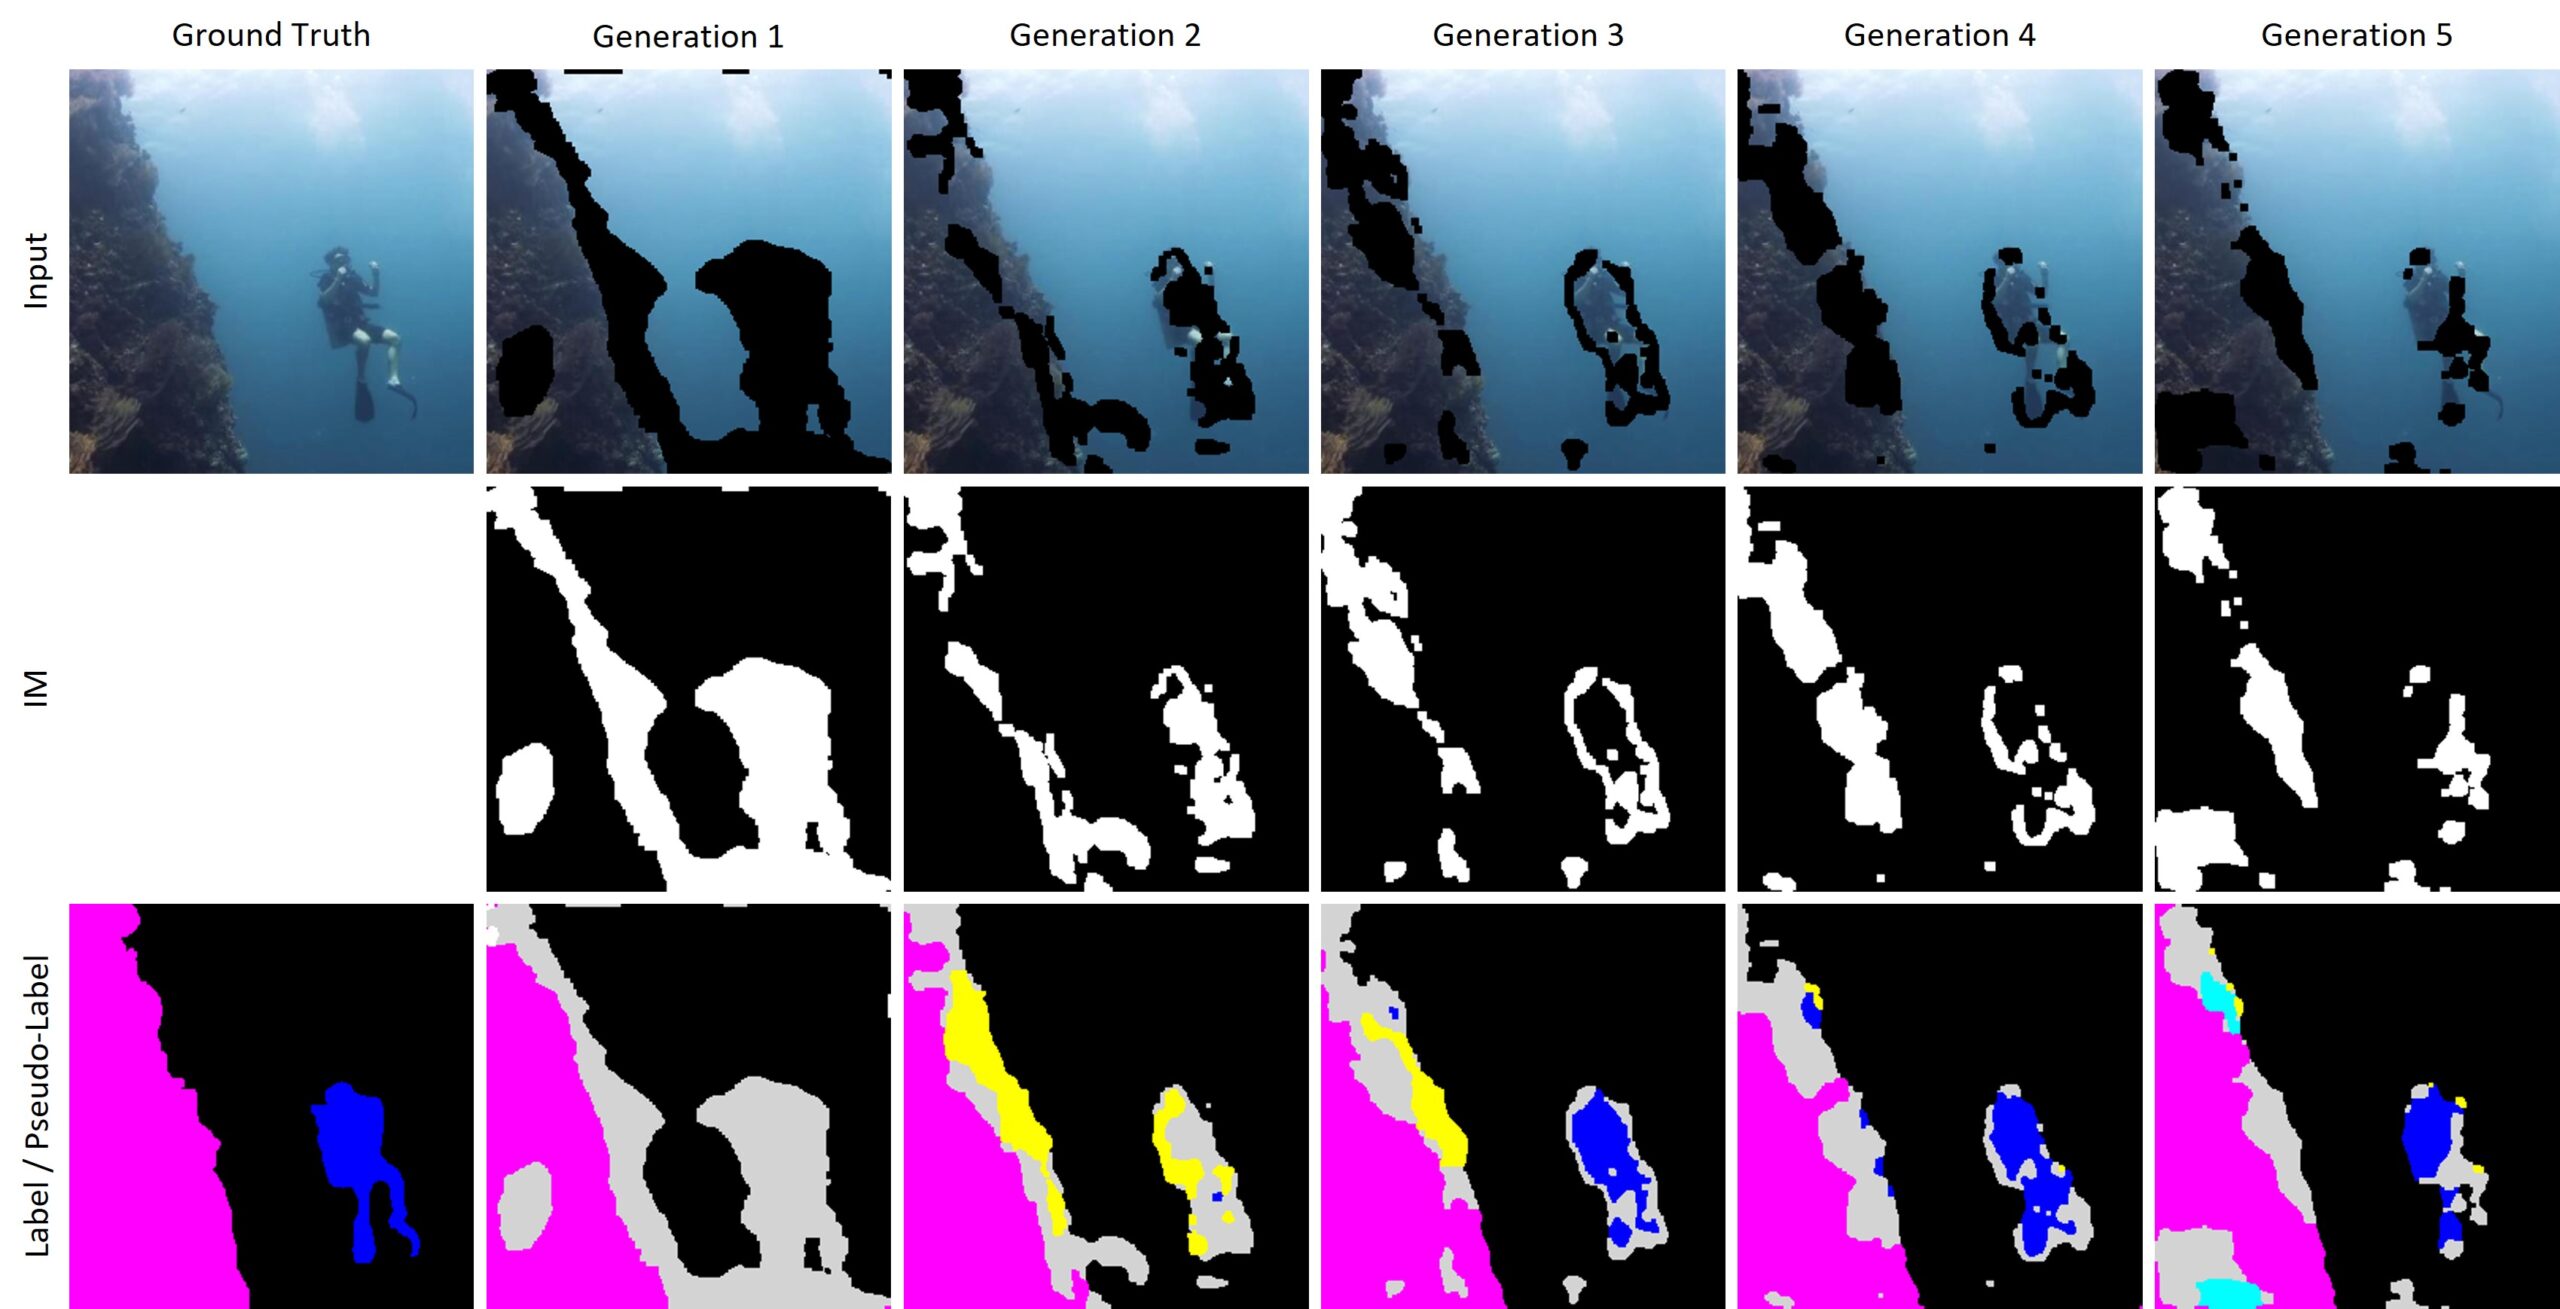
Inconsistency Masks usage
IM is used to remove the uncertainty from the pseudo-label as well as from the input image. Here you can see the changes in an input image and the corresponding pseudo-label on the SUIM dataset for IM+ over all five Generations. Magenta represents reefs, black indicates background or waterbody, gray represents IM, blue for divers, yellow for fish, and turquoise for wrecks.
Results
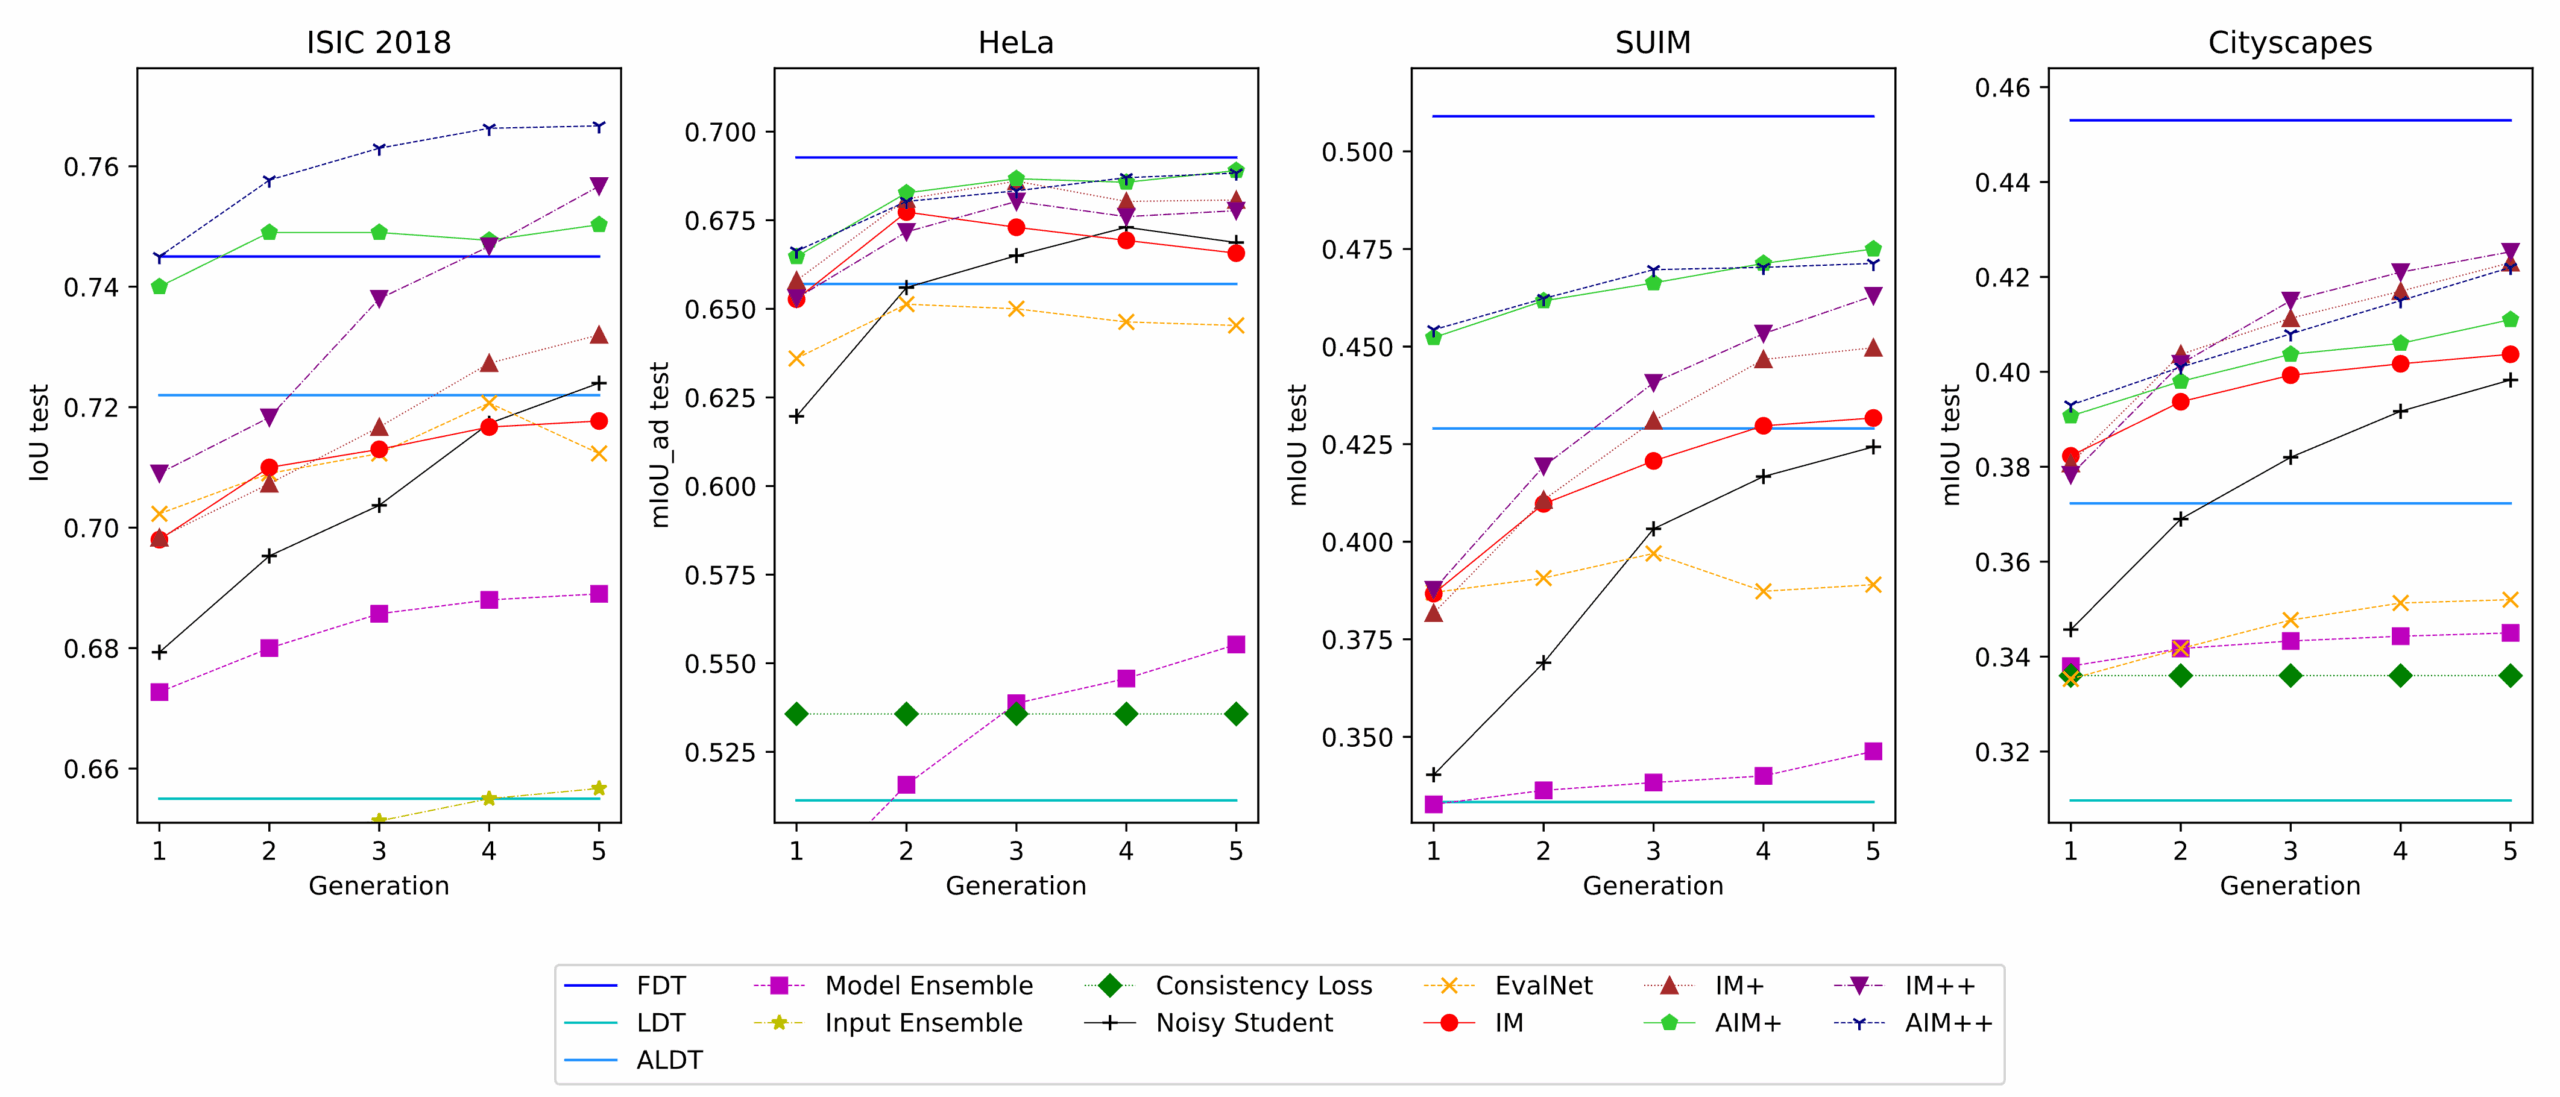
Due to limited hardware resources and the scale of our study, which required training thousands of U-Nets, we could only use small datasets and train tiny U-Nets (0.17 – 2.72 million parameters) compared to modern ViTs. But the uniform training conditions across all approaches ensure that our findings are still comparable.
In this diagram, we focus on results that exceed those of Labeled Dataset Training (LDT) to avoid excessively compressing the representation of other outcomes. For a complete overview, a diagram with all results will be available in the appendix of the paper. The benchmarks used include Full Dataset Training (FDT), Labeled Dataset Training (LDT, randomly selected 10% of the complete dataset), and Augmented Labeled Dataset Training (ALDT, Labeled Dataset with 9 additional augmented versions of each image). The SSL approaches should surpass ALDT to justify their added complexity.
Among common SSL approaches – Model Ensemble, Input Ensemble, Consistency Loss, and Noisy Student – all but Noisy Student proved to be of limited effectiveness.
EvalNet: This approach, inspired by the ValueNet from the AlphaGo paper, to our knowledge, has not yet been used for image segmentation. EvalNet assesses the segmentation quality of pseudo-labels, using only those segmentation masks for training that exceed a set threshold in IoU/mIoU score.
IM: Our novel approach demonstrates strong performance, consistently outperforming all other SSL methods across various datasets, particularly in the initial generations. The only exception is the Noisy Student method, which manages to match or surpass IM after four Generations in ISIC 2018, albeit with approximately six times more parameters.
Combination Approaches: IM+ combines IM with Noisy Student. In AIM+, the starting point is the best model from ALDT, not LDT, and the Labeled Dataset is replaced by the Augmented Labeled Dataset. In IM++ and AIM++, EvalNet is also integrated.
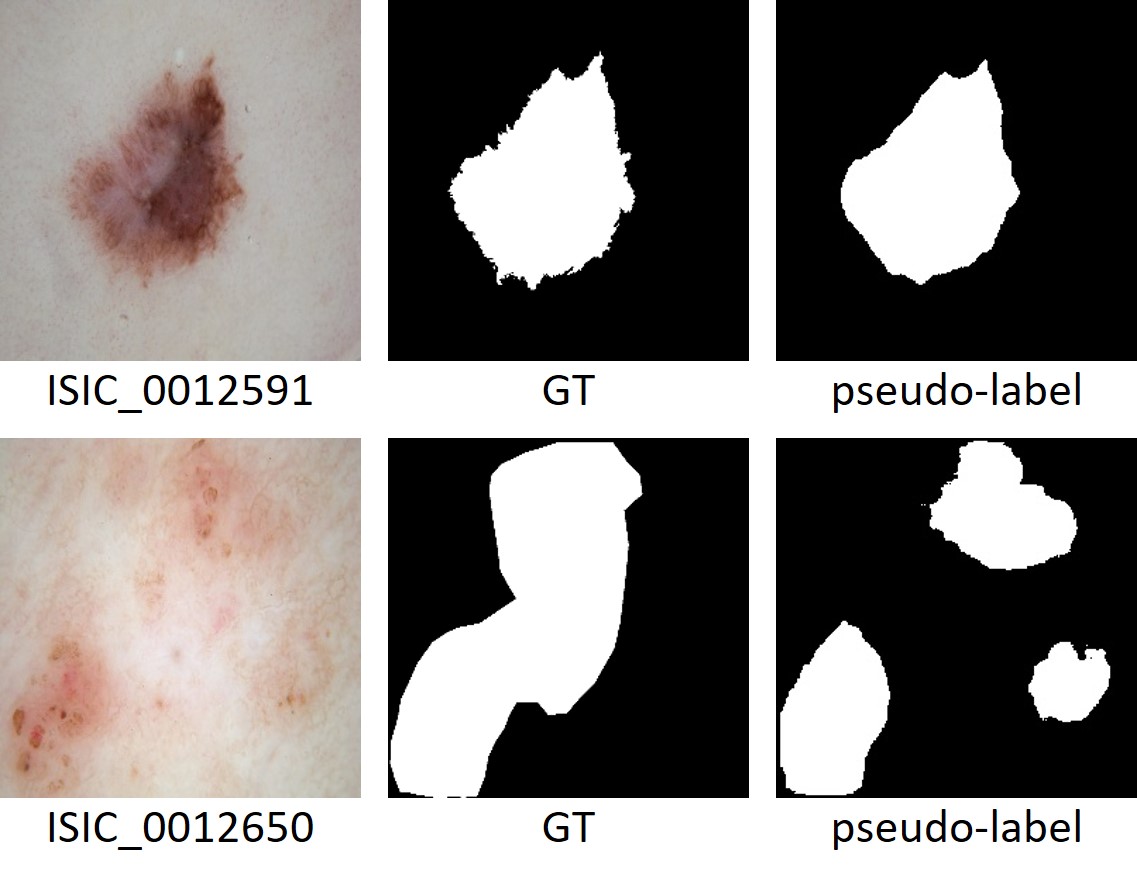
How is it possible that IM++, AIM+ and AIM++ perform better then FDT?
IM++ beats Full Dataset Training on ISIC 2018 by efficiently balances detailed and coarse annotations in its pseudo-label masks (right column) compared to the Ground Truth (GT) masks (middle column).
Acknowledgement
I would like to extend my heartfelt gratitude to the Deep Learning and Open Source Community, particularly to Dr. Sreenivas Bhattiprolu (https://www.youtube.com/@DigitalSreeni), Sentdex (https://youtube.com/@sentdex) and Deeplizard (https://www.youtube.com/@deeplizard), whose tutorials and shared wisdom have been a big part of my self-education in computer science and deep learning. This work would not exist without these open and free resources.
This library is a high-level binding for Lua 5.4/Lua 5.3/Lua 5.2/Lua 5.1/luajit. You don’t have access to the Lua stack, all you can do is read/write variables (including callbacks) and execute Lua code.
How to install it?
Add this to the Cargo.toml file of your project
[dependencies]
hclua = { version = "0.1.0", features = ["lua54"] }
How to use it?
externcrate hclua;use hclua::Lua;
The Lua struct is the main element of this library. It represents a context in which you can execute Lua code.
Reading and writing global variables of the Lua context can be done with set and query.
The query function returns an Option<T> and does a copy of the value.
The base types that can be read and written are: i8, i16, i32, u8, u16, u32, f32, f64, bool, String. &str can be written but not read.
If you wish so, you can also add other types by implementing the LuaPush and LuaRead traits.
Executing Lua
let x:u32 = lua.exec_string("return 6 * 2;").unwrap();// equals 12
The exec_string function takes a &str and returns a Option<T> where T: LuaRead.
Writing functions
In order to write a function, you must wrap it around hclua::functionX where X is the number of parameters. This is for the moment a limitation of Rust’s inferrence system.
fnadd(a:i32,b:i32) -> i32{
a + b
}
lua.set("add", hclua::function2(add));let _:() = lua.exec_string("c = add(2, 4)").unwrap();// calls the `add` function abovelet c:i32 = lua.query("c").unwrap();assert_eq!(c,6);
In Lua, functions are exactly like regular variables.
You can write regular functions as well as closures:
lua.set("mul", hclua::function2(|a:i32,b:i32| a * b));
Note that the lifetime of the Lua context must be equal to or shorter than the lifetime of closures. This is enforced at compile-time.
letmut a = 5i;{letmut lua = Lua::new();
lua.set("inc", || a += 1);// borrows 'a'for i in(0 .. 15){let _:() = lua.exec_string("inc()").unwrap();}}// unborrows `a`assert_eq!(a,20)
You can then iterate through the table with the .iter() function. Note that the value returned by the iterator is an Option<(Key, Value)>, the Option being empty when either the key or the value is not convertible to the requested type. The filter_map function (provided by the standard Iterator trait) is very useful when dealing with this.
When you expose functions to Lua, you may wish to read or write more elaborate objects. This is called a user data.
To do so, you should implement the LuaPush for your types.
This is usually done by redirecting the call to userdata::push_userdata.
it will operate the ref of object
if you use userdata::push_userdata the userdata will copy one time, for lua gc manager
if you use userdata::push_lightuserdata the userdata life manager by rust, so none copy will occup
in runtime, if we need change some logic, we need restart the process, it may lose some memory data
so sometimes we need update the logic, add keep the memory data, so we need hotfix
letmut lua = Lua::new();
lua.openlibs();
lua.enable_hotfix();let _ = lua.exec_func2("hotfix",r" local value = {3, 4} function get_a() value[2] = 3 return value[1] end function get_b() return value[2] end ","hotfix");
Swizzle makes it easy to get or set multiple attributes of an object at once, using simple attribute syntax. It works with regular classes, dataclass, Enum, and more.
It provides convenient multi-attribute access. You can grab, combine, or assign attributes in any order or combination.
Tip: Using __slots__ can be a good practice when setter=True, as it helps prevent accidentally creating new attributes if names are mistyped.
Custom Separators
For objects with multiple fields, combining attribute names without a separator can become hard to read. You can define a separator to make expressions clearer:
You can also change the type of the returned object by passing the type argument to the @swizzle decorator. You could return a plain tuple or list if you prefer.
La Calculatrice Salaire Net TangoMan permet de convertir votre salaire brut en net horaire, journalier, mensuel, annuel sur une base de 35 heures ou 39 heures par semaine en fonction des charges auxquelles vous êtes soumis et de votre nombre de congés par an.
La Calculatrice Salaire Net TangoMan est disponible en mode PWA (Progressive Web App), vous pouvez donc l’installer et l’utiliser hors connection avec une expérience utilisateur proche de celle d’une application native (mobile ou ordinateur de bureau).
🚀 Installation
Les PWA permettent une expérience utilisateur semblable aux applications natives sur mobile ou application de bureau. Elles sont installables sur toute plateforme comforme aux standards web et fonctionnent hors connexion.
⚡ Installer une PWA sur Android
Une pop up apparaît automatiquement lors du premier chagement de la page. Sinon selectionnez “Ajouter à l’écran d’acceuil”
Sur Android les PWA permettent la reception de notifications push et la synchronisation en arrière-plan entre autres fonctionalités natives.
⚡ Installer une PWA sur iOS
Pour installer une PWA sur iOS, il faut ouvrir le menu de partage de Safari et sélectionner l’option “Sur l’écran d’accueil”.
Depuis la version 12.2 iOS améliore la prise en charge des PWA, mais Apple est toujours rétissant à les prendre en charge complètement dans la mesure ou elles permettent de contourner l’App Store.
⚡ Installer une PWA sur desktop
Pour installer une PWA sur ordinateur de bureau, ouvrez les paramètres de votre navigateur (en haut à droite sur chrome) une option est disponible pour installer l’application.
⚡ manifest.json
Pour plus d’informations sur le standard du fichier manifest.json : json.schemastore.org


 https://github.com/kabisa/books


