Welcome to the Klayr DID Monorepo! This repository contains a set of powerful tools and packages that empower sidechain developers to build robust and innovative W3C Decentralized Identifier (DID) and Verifiable Credentials (VC) solutions within the Klayr Ecosystem.
About Klayr
Klayr is an open-source blockchain application platform written in Javascript, designed to bridge the gap between accessibility and web3 adoption. Learn more about Klayr from their official website, as well as it’s public GitHub Repository.
About did:klayr Method
did:klayr is a DID method specifically designed for Klayr sidechain, which outlines syntax, data model, and operations that adheres to W3C Decentralized Identifiers (DIDs) Specification.
A did:klayr DID consist of a method, chainspace, namespace, and unique-id that suitable for specific, tailored, self-sovereign identity use case. An example of a did:klayr identifier, is as follows:
Please refer to the did:klayr method spec draft for further explanation. As its still in under active development, community contribution will be much appreciated.
Klayr DID/VC Development Kit, which bundles @klayr-did/klayr-did-module, @klayr-did/klayr-decentralized-identifier, and @klayr-did/klayr-verifiable-credentials into one single package
Licensed under the Apache License, Version 2.0 (the “License”);
you may not use this file except in compliance with the License.
You may obtain a copy of the License at
http://www.apache.org/licenses/LICENSE-2.0
Unless required by applicable law or agreed to in writing, software
distributed under the License is distributed on an “AS IS” BASIS,
WITHOUT WARRANTIES OR CONDITIONS OF ANY KIND, either express or implied.
See the License for the specific language governing permissions and
limitations under the License.
Web service to allow FritzBox routers to update Gandi, Cloudflare and Porkbun DNS entries when obtaining a new IP address.
Also available as a HomeAssistant addon.
Requirements
A domain name on Gandi, Porkbun or Cloudflare
Gandi, Porkbun or Cloudflare API credentials
FritzBox router with up-to-date firmware
Optional: To build or run manually: Go 1.20
Standalone setup
Download the latest release archive for your OS/arch
Unzip, rename config.sample.toml to config.toml
Add credentials to the registrars you want to use and set enabled to true
HomeAssistant addon setup
To install via HomeAssistant, go to your addon-settings, open the add-on store and go to the repository settings via the menu on the top right
Make sure to set Zone.DNS permissions and set it to the zone your domain is in
FritzBox Setup
Log into your FritzBox
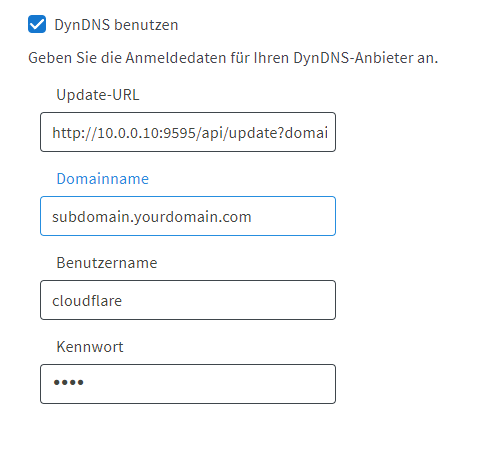
Navigate to Internet -> Permit Access -> DynDNS
Enable DynDNS and use User-defined as Provider
Enter the following URL: http://{HOST}:{PORT}/api/update?domain={DOMAIN}&subdomain={SUBDOMAIN}&ip=<ipaddr>®istrar=<username>
Replace the {HOST} and {PORT} with your deployment of the application
By default, the application uses port 9595
Replace {DOMAIN} with your base domain
e.g. yourdomain.com
Replace {SUBDOMAIN} with your subdomain or comma separated subdomains
e.g. subdomain or sudomain1,subdomain2
If you just want to use the base domain without subdomain, remove the &subdomain={SUBDOMAIN} parameter.
Enter the full domain in the Domain Name field
e.g. subdomain.domain.com (if you use multiple subdomains, just choose any of those)
or domain.com if no subdomain parameter given
Enter the registrar name in the Username field, either gandi, cloudflare or porkbun
Enter any value in the Password field
Unused, but required by the FritzBox interface
Your settings should look something like this:
Right after you save the settings, your FritzBox will make a request to the application. You should see the following
success message in its log:
Your FritzBox will now automatically communicate new IPs to the application.
Security notice
If you deploy this application outside your local network, I’d recommend you to use HTTPS for the requests.
Check below for an example on how to reverse proxy to this application with NGINX.
Linux systemd Service
To create a systemd service and run the application on boot, create a service file, for example under
/etc/systemd/system/frigabun.service.
If all is well, enable the service to be started on boot:
sudo systemctl enable frigabun
NGINX Reverse Proxy
If you want to host the service and make sure it uses HTTPS, you can use a reverse proxy.
Shown below is an example of an NGINX + LetsEncrypt reverse proxy config for this microservice.
Please look at the notebooks folder to conduct your own experminets using nnUNetv1. Using that code you can also reproduce the same model files that we are sharing in this paper. The notebook helps to perform standard nnUNetv1 experiments on the dataset.
Pre-trained Models –
All important models are available here for download.
These are nnUNetv1 models that have been exported to zip files using the nnUNet_export_model_to_zip command. To use them, all you have run is nnUNet_install_pretrained_model_from_zip, and you will be able to run any of the models.
We provide 3 models for the UCSF-ALPTDG dataset as benchmarks.
UCSF_PostTreatmentGliomaSegModel: Model that takes inputs as (1) FLAIR (2) T1 (3) T2 and (4) T1CE MR images. ['flair','t1','t2','t1ce']
UCSF_FLAIRChangeSegModel: Model that takes input as the (1) FLAIR image in Timepoint 1 (2) FLAIR image in Timepoint 2 and (3) FLAIR subtraction image (t2-t1). ['time1_flair','time2_flair','flair_subtraction']
UCSF_T1PostChangeSegModel: Model that takes input as the (1) T1CE image in Timepoint 1 (2) T1CE image in Timepoint 2 and (3) T1CE subtraction image (t2-t1). ['time1_t1ce-t1','time2_t1ce-t1','t1ce_subtraction']
We also provide 2 skull stripping models for FLAIR and T1Post skullstripping respectively.
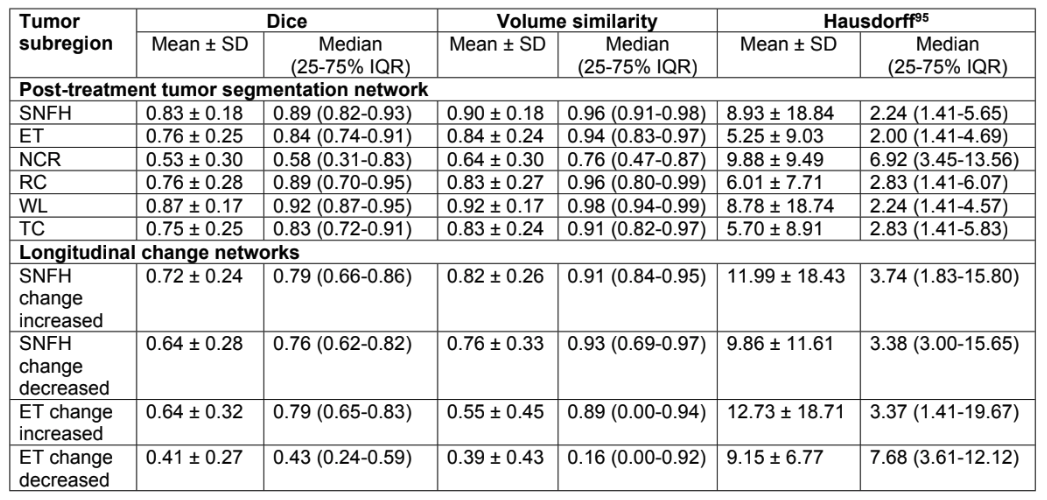
Following are the performance metrics for all the experiments performed in this project.
Citation –
If you have used this work in your project, considering citing this research paper.
@article{rudie2022longitudinal,
  title={Longitudinal Assessment of Posttreatment Diffuse Glioma Tissue Volumes with Three-dimensional Convolutional Neural Networks},
  author={Rudie, Jeffrey D and Calabrese, Evan and Saluja, Rachit and Weiss, David and Colby, John B and Cha, Soonmee and Hess, Christopher P and Rauschecker, Andreas M and Sugrue, Leo P and Villanueva-Meyer, Javier E},
  journal={Radiology: Artificial Intelligence},
  volume={4},
  number={5},
  pages={e210243},
  year={2022},
  publisher={Radiological Society of North America}
}
Usage –
Data and models cannot be used for commerical use.


 https://github.com/aldhosutra/klayr-did